- Text manipulation
- Analyzing and managing networks
- Adding and removing software
- Permission
- Process management
- Managing user environment variables
- Bash scripting
- Compressing and Archiving
- Filesystem and Storage Device Management
- The Logging System
- Using And Abusing Services
- Becoming Secure And Anonymous
- Wireless networks
- Kernel
- Automating tasks
Text manipulation
Numbering the lines
nl /etc/snort/snort.conf
Find and replace strings with sed
sed s/mysql/MySQL/g /etc/snort/snort.conf > snort2.conf
Change every mysql to MySQL.
s for search, g for gloal (all occurrences).
Change only the second mysql word.
sed s/mysql/MySQL/2 /etc/snort/snort.conf > snort2.conf
less instead of cat
- In less interface, you can find a term using slash (/). To go to the next word, type n.
leafpad
memo text editor in linux.
Analyzing and managing networks
iwconfig
Display information on a wireless adapter (router).
Change IP address
ifconfig eth0 192.168.15.3
The IP address changed to 192.168.15.3
Assigning new IP addresses from the DHCP server
dhclient eth0
By doing this, the DHCP server assigns a new IP address without rebooting the system.
Adding and removing software
searching for a package
apt-cache search snort
adding software
apt-get install snort
removing software
apt-get remove snort
Permission
Granting ownership to an individual
chown bob /tmp/bobsfile
Granting bob ownership of bobsfile.
Granting ownership to a group
chgrp security newIDS
Passing the security group ownership of newIDS.
Checking permissions
-rw-r--r--    1     root     root         33685504       June 28 2018     hashcat.hcstat
-rw-r--r--    1     root     root         33685504       June 28 2018     hashcat.hctune
drwxr-xr-x    2     root     root         4096           Dec 5 10: 47     masks
drwxr-xr-x    2     root     root         4096           Dec 5 10: 47     OpenCL
- First letter: file type (d for directory, - for file)
- First column: the permissions of the owner, group, and the other users.
- Third column: the owner of the file.
Chaging permission
chmod 711 hashcat.hcstat
chmod u+x, o+x hashcat.hcstat
Umask
umas can remove permissions.
| New files | New directories | |
|---|---|---|
| 6 6 6 | 7 7 7 | Linux base permissions |
| 0 2 2 | 0 2 2 | umask |
| 6 4 4 | 7 5 5 | Resulting permissions |
umask secures permissions. restricts the basic permissions.
In kali, the umask is preconfigured to 022 (default it 644 for files and 755 for directories).
umask can be edited from /home/username/.profile file.
Granting temporary root permissoins with SUID
adding 4 in front of permissions.
chmod 4644 filename
we can search for files set to SUID.
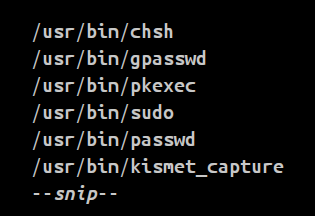
And files with sudo permissions will look like below.
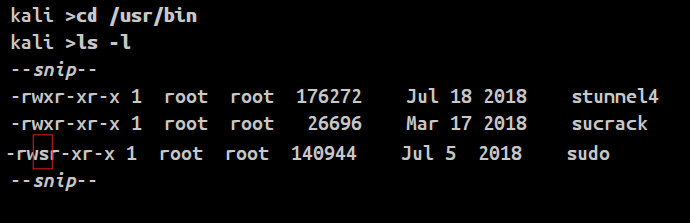
It has an s in place of the x. It means the SUID bit is set.
SGID
adding 2 in front of permissions.
chmod 2644 filename
Process management
Viewing processes
all processess and all users.
ps aux
USER     PID      % CPU    % MEM       VSZ       RSS  TTY      STAT     START       TIME     COMMAND
Root     1        0.0      0.4         202540    6396 ?        Ss       Apr24       0: 46    /sbin/init
Root     2        0.0      0.0         0         0 ?           S        Apr24       0: 00    [ kthreadd]
Root     3        0.0      0.0         0         0 ?           S        Apr24       0: 26    [ ksoftirqd/ 0]
--snip--
root     39706    0.0      0.2         36096    3204  pts/ 0   R +      15: 05      0: 00    ps aux
It can be used with grep command.
- top command shows the processes by it’s size.
Running processes in the background
Adding & at the end ot the command.
leafpad newscript &
flameshot &
Moving a process to the foreground
fg PID
if you don’t know the PID, you can find it with ps command.
Scheduling processes
- at : run once at some point in the future
- crond : run regularly
at 7:20pm
at 7:20pm June 25
at noon
at tomorrow
at now + 5days
at 7:20am 09/30/2100
at 7:20am
at> /root/myscanningscript
myscanningscript will be executed at 7:20am
Managing user environment variables
Viewing environment vaiables
kali > env
XDG_VTNR = 7 SSHAGENT_PID = 922 XDG_SESSION_ID = 2 XDG_GREETER_DATA_DIR =/ var/ lib/ lightdm/ data/ root GLADE_PIXMAP_PATH =: echo TERM = xterm SHELL =/ bin/ bash --snip-- USER = root --snip-- PATH =/ usr/ local/ sbin :usr/ local/ bin:/ usr/ sbin:/ sbin/ bin --snip-- HOME =/ root --snip--
- Environment variables are always uppercase.
- HISTSIZE variable contains command history.
If you don’t want to leave any command histoty, then set the HISTSIZE to 0.kali > HISTSIZE=0
Making variable value changes permanent
- change in an environment variable will disapper when the terminal is closed.
- export will change a value permanently
kali > HISTSIZE=1000
kali > export HISTSIZE
Changing your shell prompt
The default shell prompt takes the following format.
username@hostname:current_directory
for example: root@kali:current_directory
The default shell prompt can be changed by setting the PS1 varilable.
\u The name of the current user
\h The host name
\W The base name of the current working directory
For example
kali > PS1="World's Best Hacker:#"
World's Best Hacker:#
World's Best Hacker:#pwd
/home/eon
kali > export PS1
kali > export PS1='C:\w> '
C:/tmp>
Adding to the PATH variable
A terminal will search for any command in $PATH.
If I installed a new tool called newhackingtool into the /root/newhackingtool directory, then I need to go to the directory to use the tool.
However, if I add it to the $PATH, then I can use the tool from any directories.
kali > PATH=$PATH:/root/newhackingtool
original path + new path of the tool. Appending using “:”. Don’t forget to contain the original PATH.
- Adding too many path variables could slow down the terminal.
Creating a user defined variable
kali > NEWVARIABLE="apple apple apple"
kali > echo $NEWVARIABLE
apple apple apple
kali > unset NEWVARIABLE
kali > echo $NEWVARIABLE
kali >
Bash scripting
shebang
You need to tell your operating system which interpreter to use.
#!
In the case of bash, #! /bin/bash
#! /bin/bash
# This is bash script. In this one, you prompt /
# the user for input, place the input in a variable, and /
# display the variable contents in a string.

echo "what is your name?"
read name
echo "what chapter are you on in linux basics for hackers?"
read chapter
echo "Welcome" $name "to chapter" $chapter "of linux basics for hackers!"
/dev/null
/dev/null is simply a place to send output so that it disappears.
Compressing and Archiving
tar
- Archiving
kali > tar -cvf HackersArise.tar hackersarise1 hackersarise2 hackersarise3 hackersarise1 hackersarise2 hackersarise3
c: create, v: verbose, f: following file(s)
- See the contents list without extracting.
kali > tar -tvf HackersArise.tar
-rwxr-xr-x 1 root root               22311    Nov 27     2018 13: 00 hackersarise1. sh
-rwxr-xr-x 1 root root               8791     Nov 27     2018 13: 00 hackersarise2. sh
-rwxr-xr-x 1 root root               3992     Nov 27     2018 13: 00 hackersarise3. sh
- Extract the files.
kali > tar -xvf HackersArise.tar
hackersarise1. sh
hackersarise2. sh
hackersarise3. sh
dd
- a bit by bit copy.
- deleted files are copied too.
- used in forensic.
- very slow.
dd if=inputfile of=outputfile
kali > dd if =/ dev/ sdb of =/ root/ flashcopy
1257441 = 0 records in
1257440 + 0 records out
7643809280 bytes (7.6 GB) copied, 1220.729 s, 5.2 MB/s
Filesystem and Storage Device Management
dev directory (device)
brw-rw----    1     root root                 8,           0         May 16 12: 44       sda
brw-rw----    1     root root                 8,           1         May 16 12: 44       sda1
brw-rw----    1     root root                 8,           2         May 16 12: 44       sda2
brw-rw----    1     root root                 8,           5         May 16 12: 44       sda5
brw-rw----    1     root root                 8,           16       May 16 12: 44       sdb
brw-rw----    1     root root                 8,           17       May 16 12: 44       sdb1
- Device File Description | Disk | Meaning | | :— | :——————— | | sda | First SATA hard drive | | sdb | Second SATA hard drive | | sdc | Third SATA hard drive | | sdd | Fourth SATA hard drive |
The SATA hard drive (500GB).

-
Partition Description |Partition|Meaning| |:—|:—| |sda1|The first partition (1) on the first (a) SATA drive| |sda2|The second (2) partition on the first (a) drive| |sda3|The third (3) partition on the first (a) drive| |sda4|The fourth (4) partition on the first (a) drive|
- lists all the partitions of all the drives.
kali > fdisk -l Device Boot Start End Sectors Size Id Type /dev/ sdb1 32 62498815 62498784 29.8G 7 HPFS/ NTFS/ exFAT - HPFS: High Performance File System
- NTFS: New Technology File System (new)
- exFAT: Extended File Allocation Table (old)
These are not linux systems. They are macOS and Windows System. You can guess the OS type by observing the file types.
listing block device information
kali > lsblk
Name             MAJ:MIN       RM     SIZE     RO    TYPE    MOUNTPOINT
fd0              2: 0          1      4K       0     disk
sda1             8: 0          0      20G      0     disk
|-sda1           8: 1          0      18.7G    0     part    /
|-sda2           8: 2          0      1K       0     part
|-sda5           8: 5          0      1.3G     0     part    [ SWAP]
sdb              8: 16         1      29.8G    0     disk
|-sdb1           8.17          1      29.8G    0     disk    / media
sr0              11: 0         1      2.7G     0     rom
Mounting storage devices
mount /dev/sdb1 /mnt
mount the new hard drive sdb1 at the /mnt directory.
mount /dev/sdc1 /media
mount the flash drive sdc1 at the /media directory.
umount /dev/sdb1
unmount /dev/sdb1. (no n in umount)
Getting information on mounted disks
kali > df
Filesystem                     1K-Blocks        Used           Available   Use%         Mounted on
rootfs                         19620732         17096196       1504788     92%         /
udev                           10240            0              10240       0%          /dev
--snip--
/dev/sdb1                      29823024         29712544       110480      99%         /media/USB3.0
The Logging System
syslogd automatically log events on your computer.
Kali(Debian) comes with rsyslog by default.
The rsyslog config file
- /etc/rsyslog
mail.* /var/log/mail
log mail events of all(_) priorities to /var/log/mail.
kern.crit /var/log/kernel
log kernel events of critical priority or higher to /var/log/kernel.
_.emerg \*
log all events of emergency priority to all logged-on users.
Cleaning up with logrotate
- regularly moving old logs to other location
- using cron job to employ the logrotate utility
- /etc/logrotate.conf
Removing evidence
- shred overwrites a file many times so that it is hard to recover for forensic investigators.
shred <File>
kali >shred -f -n 10 /var/log/auth.log.*
-f for permission, -n for a number of times. - simply stop the rsyslog daemon
service rsyslog stop
But in this case, root privilege is required.
Using And Abusing Services
start, stop, or restart.
service servicename start|stop|restart
For example,
service apache2 start
Apache
- index file
/var/www/html/index.html
Mysql
- login as root.
kali >mysql -u root -p - accessing a remote database
mysql -u root -p 192.168.1.101 - see table information
describe <table>;
Becoming Secure And Anonymous
four methods to explore web anonymously.
- The Onion Network
- Proxy servers
- Virtual private networks
- Private encrypted email
Tor network
Uses limited routers separated from regular routers (about 7000).
Only the IP address of the previous hop can be seen. The fallback is that it is a lot slower because of the number of routers. In order to use it, you need to just download the browser.
To access a darkweb, Tor is required.
Proxy servers
A proxy server will remain logs. However, an investigator needs subpoena or search warrant to obtain the logs.
To harden security, you can use more than one proxy server. It is called a proxy chain.
Kali has a proxychain tool. For example,
kali >proxychains nmap -sT -Pn <IP address>
kali >proxychains firefox www.google.com
Proxy config file
- /etc/proxychains.conf you can add proxy servers in the config file. The Tor server is set to default. If you will not use Tor, then comment it out.
- dynamic chaining
When a proxy server is dead, it uses another proxy servers instead. Otherwise, a request will fail.
uncomment dynamic_chain from the config file. - random chaining
proxy serveres on the list will be chosen randomly. In order to use this option, comment out dynamic_chain and stric_chain. Then, uncomment random_chain and chain_len. The chain_len sets the number of proxy servers to be used.
As the number of chain_len increases, anonymity will increase. However, the latency will increase too.
Also, using free proxy servers should be avoided since they may sell your data and information.
Virtual private network
The traffic is encrypted. Also, IP address and location of where you are will change so that keep you anonymous. However, the device you connect record your information. Thus, anyone who is able to access the device can uncover your information. There are VPN services that don’t record any logs. Using these services is the safest.
The strength of VPN is that all of your traffic is encrypted.
Encrypted email
- Protonmail your email is encrypted in Protonmail server and even the admin can’t read the email.
Wireless networks
wifi networks
- AP : access point
- ESSID : extended service set identifier. Same as SSID.
- BSSID : basic service set identifier. Same as the MAC address of the device.
- SSID : service set identifier. The name of the network.
- Security : WEP (sucks) < WPA (better) < WPA2-PSK (currently being used)
-
Modes : managed master monitor - managed: ready to join (client)
- master : ready to act (server)
- monitor : monitor traffics
command for wifi interfaces
kali >iwconfig

lo         no wireless extensions
wlan0 IEEE 802.11bg     ESSID:off/ any
      Mode:Managed     Access Point:Not-Associated       Tx-Power = 20 dBm
      Retry short limit: 7       RTS     thr:off       Fragment thr:off
      Encryption key:off
      Power Management:off
eth0     no wireless extensions
kali >iwlist wlan0 scan

wlan0               Scan completed:
Cell 01 - Address: 88: AD: 43: 75: B3: 82
Channel: 1
Frequency: 2.412GHz (Channel 1)
Quality = 70/ 70       Signal level =-38 dBm
Encryption key:off
ESSID:" Hackers-Arise"
The one we often see from wifi icon.
kali > nmcli dev wifi
*    SSID                       MODE         CHAN     RATE                  SIGNAL     BARS         SECURITY
Hackers-Arise                   Infra        1        54 Mbits/ s           100                     WPA1 WPA2
Xfinitywifi                     Infra        1        54 Mbits/ s           75                      WPA2
TPTV1                           Infra        11       54 Mbits/ s           44                      WPA1 WPA2
To connect to an AP.
nmcli dev wifi connect AP-SSID password APpassword
kali > nmcli dev wifi connect Hackers-Arise password 12345678
aircrack-ng
- To put wireless network in monitor mode, use the airmon-ng command.
kali >airmon-ng start wlan0
In the monitor mode, it can access all the wireless traffic. And your wireless interface will get a new name. - To find key data from the wireless traffic.
kali >airodump-ng wlan0mon
Capture all packets on channel 10.
airodump-ng -c 10 --bssid 01: 01: AA:BB:CC: 22 -w Hackers-ArisePSK wlan0mon
Disconnect the connection and make it re-authenticat to capture hash.
aireplay-ng --deauth 100 -a 01: 01: AA:BB:CC: 22-c A0: A3: E2: 44: 7C:E5 wlan0mon
Finally brute force the password using password lists.
aircrack-ng -w wordlist.dic -b 01: 01: AA:BB:CC: 22 Hacker-ArisePSK.cap
Bluetooth
blueZ
- Scanning for a bluetooth device.
kali > hciconfig
hci0: Type: BR/ EDR     Bus: USB
BD Address: 10: AE: 60: 58: F1: 37     ACL     MTU: 310: 10     SCO     MTU:     64: 8
UP RUNNING PSCAN INQUIRY             RX bytes: 131433 acl: 45 sco: 0 events: 10519     errors: 0
TX bytes: 42881     acl: 45 sco: 0 commands: 5081 errors: 0
- Checking whether the connection is enabled.
kali >hciconfig hci0 up
It no output is displayed, it is ready to connect. - Scanning other bluetooth devices.
kali >hcitool scan

scanning...
72: 6E: 46: 65: 72: 66             ANDROID BT
22: C5: 96: 08: 5D: 32             SCH-I535
- Getting more information of discovered device.
kali > hcitool inq Inquiring...
24: C6: 96: 08: 5D: 33         clock offset: 0x4e8b             class: 0x5a020c
76: 6F: 46: 65: 72: 67         clock offset: 0x21c0             class: 0x5a020c
The class indicates a type of bluetooth you found.
- Seeing whether a device is reachable.
kali > l2ping 76: 6E: 46: 63: 72: 66 -c 4
Ping: 76: 6E: 46: 63: 72: 66 from 10: AE: 60: 58: F1: 37 (data size 44)...
44 bytes 76: 6E: 46: 63: 72: 66 id 0 time 37.57ms
44 bytes 76: 6E: 46: 63: 72: 66 id 1 time 27.23ms
44 bytes 76: 6E: 46: 63: 72: 66 id 2 time 27.59ms
Kernel
checking the kernel
kali >uname -a
Linux Kali 4.6.0-kalil-amd64 #1 SMP Debian 4.6.4-lkalil (2016-07-21) x86_64
or
cat /proc/version
Automating tasks
- /etc/crontab Time representations in crontab.
| Field | Time unit | Representation |
|---|---|---|
| 1 | Minute | 0-59 |
| 2 | Hour | 0-23 |
| 3 | Day of the month | 1-31 |
| 4 | Month | 1-12 |
| 5 | Day of the week | 0-7 |
Day of the week : 0 and 7 are Sunday.
M     H     DOM     MON     DOW     USER     COMMAND
30    2     *       *       1-5     root     / root/ myscanningscript
Every night at 2:30 AM, Monday to Friday.
crontab shortcuts
crontab provides built in shortcut for scheduling.
- @yearly
- @annually
- @monthly
- @weekly
- @daily
- @midnight
- @noon
- @reboot
@midnight user / usr/ share/ MySQLsscanner.sh
rc scripts to run jobs as start up
update-rc.d <name of the script or service> <remove|defaults|disable|enable
For example, the below command sets postgreSQL to run every time you boot your system.
kali >update-rc.d postgresql defaults